WARNING: This is picture heavy!
I hope that all of you know that I am always honest with you. If I don't like a polish, I will tell you. If I love a polish, I make that clear. And ALL of the nail art on my page is 100% done by me unless otherwise stated, like the time I used a Jamberry nail shield. That being said, I had an interesting situation come up recently. My interlocking dot nails were shared by a Facebook page with a large following and I was then accused of wearing press-on nails by some commenters. I found this very interesting because the basis of the claim was that the polish was too thick. I wore press-on nails as a child and they are anything but thick. However, apparently my need for compulsive clean-up and lots of top coat led several people to think that I was lying about having done my own nail art.
I hope that all of you know that I am always honest with you. If I don't like a polish, I will tell you. If I love a polish, I make that clear. And ALL of the nail art on my page is 100% done by me unless otherwise stated, like the time I used a Jamberry nail shield. That being said, I had an interesting situation come up recently. My interlocking dot nails were shared by a Facebook page with a large following and I was then accused of wearing press-on nails by some commenters. I found this very interesting because the basis of the claim was that the polish was too thick. I wore press-on nails as a child and they are anything but thick. However, apparently my need for compulsive clean-up and lots of top coat led several people to think that I was lying about having done my own nail art.
Now, I know I do my own work, but that means nothing to argumentative people, so I let the conversation go after saying that I had, in fact, done the art myself. It's a really weird feeling to have your work called into question and to be helpless to do anything other than speak the truth. Luckily, many amazing people and fans defended me and I just adore each and every one of them! Thank you to each and every one of you who defended me!
I decided to do a tutorial on interlocking dot nails so you can recreate them at home and so that people can see just how many layers of polish go into creating nail art! Plus, there's no way to say I didn't do these since I took pictures the entire time, hahaha!
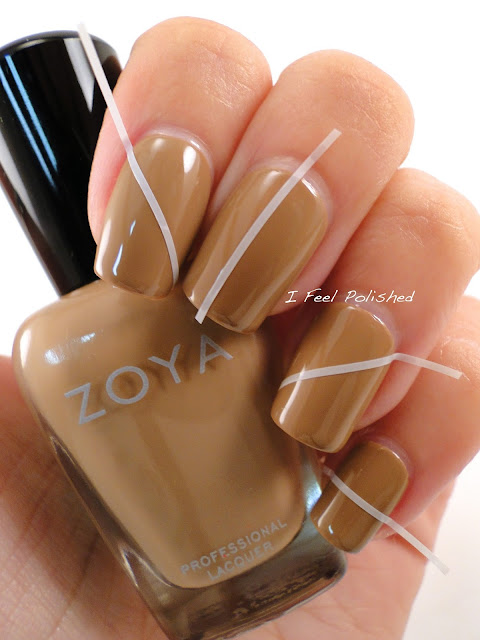
Begin by choosing your base color. I began with two coats of Zoya Flynn followed by one coat of top coat:
Once your polish is dry, using striping tape, section off half of your nail. I chose to alter the way I taped my nail in half:
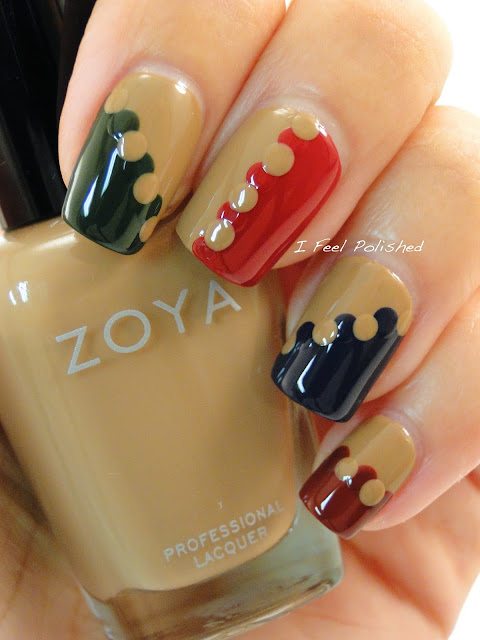
Then, choose the color(s) you would like to use on each half of the nail. I went with a variety of colors this time. Zoya Hunter on my index nail, Zoya Livingston on my middle nail, Zoya Sailor on my ring nail, and Zoya Pepper on my pinkie. Polish one half at a time and immediately pull the tape off:
Using a large dotting tool and the color(s) you just used, add dots along the halfway line. Keep enough space between them that you could add another dot:
Then, go back to your base color and dot that color in between the dots you just made:
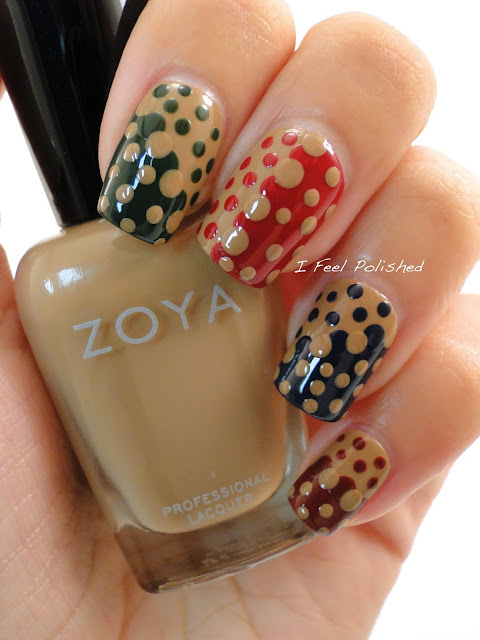
Then, add dots of your base color over the accent color and dots of your accent color over your base color.
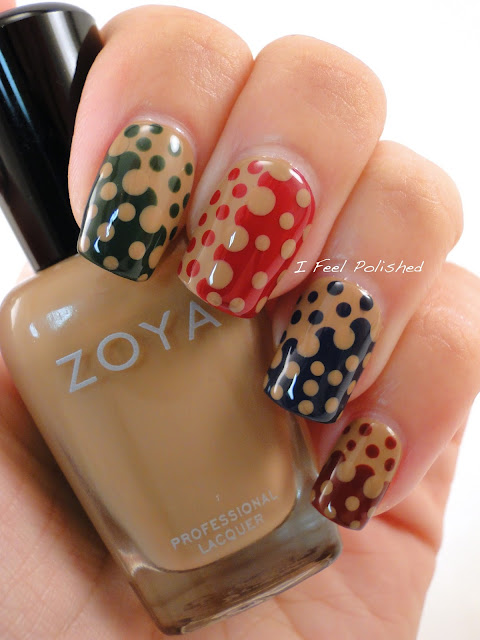
Finally, add your top coat! Make sure you let your dots dry well so that you limit dragging the color down with the top coat! I hope this helped! Thank you for your continued support! I appreciate each and every one of you! Enjoy! :)


Great tutorial, definitely going on my must-try list :) I can't believe anyone would accuse you of not doing your own nail art!
ReplyGreat tutorial! This is awesome! :)
ReplyI can totally tell those are acrylics (gigglesnort) ;)
ReplyGreat tutorial and beautiful art as always!
Wow that is quite a compliment when your nails look so awesome that they look manufactured type perfect. Who cares what people say? I love your nail art and am inspired by your work.
ReplyIt's crazy someone would say you didn't do this yourself, that you wore nail wraps!!?!? They are fantastic & by this tutorial one can see how that look comes to be. I really love this look, I've been wanting to learn how to do interlocking colors.
ReplyAwesome tutorial! You make it look easy enough that I might try it :)
Replythis is really neat! and your nails look amazing <3
ReplyThank you! Definitely give them a try! I know, I couldn't believe it either! Hahaha!
ReplyThank you, Lisa!
ReplyBahaha! You seem grumpy, perhaps you should go outside and play! Thank you! :)
ReplyRight?! Glad you're inspired! :)
ReplyI know, I thought it was crazy too! Definitely give them a try! They are much easier than they look!
ReplyDO IT! They are pretty easy! :)
ReplyThank you so much! <3
ReplyAmazing! I would have never guessed this is such an easy look to pull off (and by easy I do not mean that it's something I could ever pull off, lol). I adore these colors so much! Flynn is def a must have :)
Replyi love watching the transformation through each step - and great color choices too!
ReplyWOW! These are spectacular! Love the step by step...thanks so much - great post!
ReplyI LOVE THIS!!!!!
ReplyThanks! I'm sure you could do it, Liesl! It really is easy! :)
ReplyThank you, Missy! :)
ReplyThank you! Glad you like the tutorial! :)
ReplyThank you so much! :)
Reply