Saturday, September 29, 2012

I'm Officially a Cult Member!

Oh. My. Gosh. I LOVE CULT NAILS! Bloom48 was having a sale on their Cult Nails polishes a few weeks ago so I decided to give them a try. $14 later (shipping included!), I had three Culties on their way to me! My favorite of the bunch is Mind Control. It is a dark grey (almost black) polish with pinkish purple glitter in it. The glitter shifts to a golden color in certain lighting. This polish is absolutely stunning. I want two more just for back-up purposes! I knew I had to use it immediately, which is really saying something because I usually can't get to new polishes for at least a month or three. ;) I did the best matching I could to find a complementary purple to go with Mind Control for an artsy accent nail. I've been wanting to do an argyle mani for quite some time and Mind Control seemed perfect for it! 

It took me three coats of Mind Control for complete opacity on my plastic nail swatch so I polished my nails with OPI Black Onyx first so as to not waste a drop of Mind Control. My accent nail was polished with Zoya Perrie. I had intended to use Zoya Zara but I completely forgot about her when I was grabbing a matching purple! I think Mind Control looks better with a creme complementary color anyways. I used two coats of Mind Control over Black Onyx. I then taped off my accent nail and polished one coat of Black Onyx before one coat of Mind Control. Finally, I added a cute rhinestone in the middle and a coat of HK Girl to complete the look! This manicure photographed SO well. Not a single picture turned out poorly! And Cult Nails bottles are so easy to photograph with! No awkward claw hand or shaking my hand out because it's cramping up! YAY! Anyways, get ready for photo-overload! Enjoy! :)

Cult Nails Mind Control

Cult Nails Mind Control

Cult Nails Mind Control

Cult Nails Mind Control

Cult Nails Mind Control

Tuesday, September 25, 2012

Football Season: University of Florida

Rounding out my college football nails...University of Florida! I'm surrounded by Gators fans on a daily basis, from my friends to my students to their parents. UF is big around here so it only made sense to have my final set of college nails be UF! For the accent nail I used OPI Atomic Orange. I drew the "F" on with Zoya Song. Enjoy! :)

UF Nails

University of Florida nails

Gators Nails

Sunday, September 23, 2012

Football Season: Michigan State

And the football nails continue! Today, I have Michigan State! I know more U of M fans, but my State fan friends are much more present on Facebook! :) The accent nail is the only difference between this mani and the University of Michigan nails. For the accent nail I used China Glaze Glittering Garland. I drew the "S" on with Julep Kate. My final college football mani will be on Tuesday! Enjoy! :)

Michigan State Nails

Michigan State Nails

MSU Nails

Spartan Nails

Saturday, September 22, 2012

Football Season: University of Michigan

I asked for some nail art ideas a week or two ago on  and the only idea I got was football nails! So, even though I loathe football, here they are! They've actually been a big hit! My students and co-workers loved them, as did my grad school friends! Even though I don't like football, I have some die-hard football family members and friends. And of course, they all root for different teams. Therefore, I represented the three teams that are most prevalent in my life. I'm going to post the three ideas today, tomorrow, and Tuesday. I decided to start off by sharing my mom's favorite team: University of Michigan! My mom has a passion for U of M that I've never seen in any other person! :)

To create this look, I polished two coats of China Glaze Mahogany Magic on all of my nails except for my accent nail. I then used white striping tape to create the football threads. For the accent nail, I used Zoya Pippa. Then, I drew the "M" on with Zoya Song. So, here are my U of M nails dedicated to my mom! Don't forget, another set of college football nails will be on the blog tomorrow! Enjoy! :)

University of Michigan Nails

U of M Nails

Football Nails

Tuesday, September 18, 2012

Indie Love: Never Glow Up

My indie love continues with Sonnetarium. I posted once before on Snowfall, my first Sonnetarium polish. After receiving Snowfall, I knew I needed more of Michelle's polishes. They are AWESOME. Since then, I've added a few more of her polishes to my collection, including the beauty I'm posting on today. Never Glow Up is a sheer turquoise polish with iridescent glitter and shimmer in it. Oh, did I also mention that it glows in the dark? Yep! I did freak myself out a few times in the middle of the night though! :)

I'm sure with three coats, Never Glow Up (NGU) could be pretty full coverage. However, I decided to use underwear in order to conserve my NGU. I used two coats of Color Club Blue-Ming on all of my nails except for my accent nail. I actually really like Blue-Ming and it's one of the few things I got from Birchbox that I actually like! I polished one coat of NGU over Blue-Ming. I used two coats of Julep Kate on my accent nail before dotting it with Blue-Ming. One coat of HK Girl finished this easy mani up! NGU requires a "charge" before it will glow. This can be achieved by simply being around light but I held my nails up to the bathroom light for about 30 seconds to get a bright glow. Enjoy! :)    

Sonnetarium Never Glow Up

Sonnetarium Never Glow Up

Sonnetarium Never Glow Up

Sonnetarium Never Glow Up


Saturday, September 15, 2012

Hits Dionisio

I got some pretty awesome nail mail from Alex at Glittery and Polished around the end of July that included my first Hits polish: Dionisio. I love holo polish (who doesn't, right?) so I've been pretty excited about Dionisio. I was trying to think up the perfect nail art for it but simplicity has to win out sometimes when I have six school assignments due the next day... :)

Striping tape has to be one of the easiest tools for nail art. Dotting tools are right there with striping tape. For this manicure I polished my accent nail with Julep Kate and allowed it to dry completely. I then placed three pieces of striping tape over Kate on an angle. One coat of Dionisio went over the top of the striping tape and then I pulled them off using tweezers! The other nails each have two coats of Dionisio on them without underwear. The last two pictures used flash to show the awesomeness of Dionisio in sunlight! Enjoy! :)

Hits Dionisio

Hits Dionisio

Hits Dionisio

Hits Dionisio

Tuesday, September 11, 2012

Glue Base Coat...Peel Off Polish?

I'm sure some (or many) of you have heard of the latest craze in glitter polish removal...the glue base coat. I guess the idea originated when someone noticed the ingredients on the Essence peel-off base coat were nearly identical to regular white glue. Does anyone know who the first person to figure this out was? Anyways, I read a little about the topic and felt knowledgeable enough to give it a go. 

I bought a bottle of Elmer's Glue and squeezed it into an empty polish bottle. I filled it about 3/4 of the way full and then added some water so it was nearly full. After a few good rolls in my hands (shaking=bubbles) I was ready to go! I polished two thin coats of my glue base coat on. DO NOT polish a regular base coat before the glue coat. I allowed each coat to dry thoroughly before moving on. The coats dried fairly quickly; I'd say within 2-3 minutes. I tried this again a few days later and I found that the glue seemed thicker. I only did one coat that time because it was taking forever to dry (8-10 minutes). Once the glue is dry, continue with your manicure! I polished three coats of Alyssa and HK Girl as my top coat. Four days later I used an orange stick to carefully peel a corner of the polish. I started near my cuticle and just slid the orange stick down the side of my nail. Once that area had popped up, I gently peeled the rest off of my nail with my fingers. Each nail came off easily with very little residue! SO MUCH EASIER than the tin foil method! And my nail was left completely undamaged! YAY! I wouldn't necessarily use this EVERY time I polish my nails, but I will definitely use it if glitter is involved! Enjoy! :) 

Elmer's Glue Base Coat

Peel Off Nail Polish Base Coat


Saturday, September 8, 2012

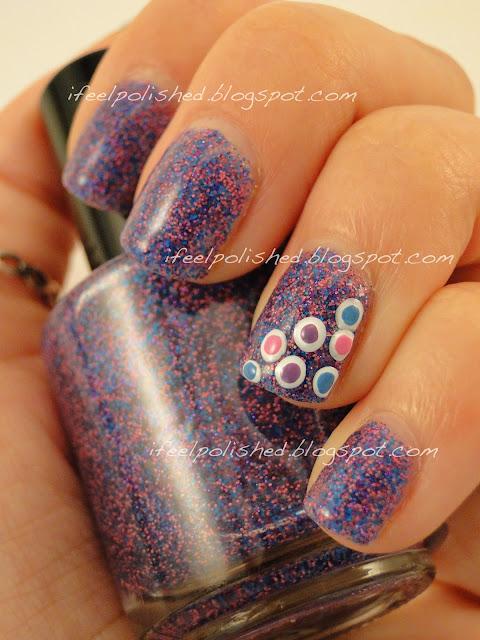
Indie Love: Alyssa

I think I'm in love. I know I've already mentioned my love for Amy's Nail Boutique. The original reason I found her shop was because she makes fine matte glitter polishes (think Floam). By the time I got to her Etsy shop, she was sold out of the fine glitter polish, so I purchased Woodsie's Wish and Sophie. Though I was sad she was out of her fine matte glitter polishes, I love Woodsie's Wish and Sophie. However, Amy restocked at the end of July and I bought two of the polishes I've been lemming: Pink Lemonade and Alyssa. I decided to use Alyssa first because finding swatches of it online was darn near impossible! Anyways, I LOVE ALYSSA. She's a gorgeous polish with pink and blue fine matte glitter. She also has fine sparkly purple glitter. If you don't want the sparkle, Amy sells another polish called Cotton Candy, which is just the blue and pink matte glitter. Alyssa has so much depth and she's just beautiful. I used three coats of Alyssa without underwear. I finished her off with HK Girl to even her out. She applied well but was a little gritty. And since I've been slacking like crazy on my nail art, I used my dotting tool to add some pretty dots using Julep Kate, Zoya Yummy, Zoya Shelby, and OPI A Grape Fit. This has to be one of the easiest mani's ever and I really like it! If you haven't checked out Amy's Nail Boutique yet, I highly suggest it! 

In addition to this awesome polish, I also tried the new Elmer's Glue base coat that's going around like crazy. I used two thins coats of Elmer's Glue as my base coat...I'll let you know how easily it peels off and how long it lasts in a post next week! 

This is going to be a little picture heavy but I was (and am) seriously in love! Enjoy! :)

Amy's Nail Boutique Alyssa

Amy's Nail Boutique Alyssa

Amy's Nail Boutique Alyssa

Amy's Nail Boutique Alyssa

Amy's Nail Boutique Alyssa

Amy's Nail Boutique Alyssa


Tuesday, September 4, 2012

Gold with White Crackle!


I think I've decided that Tuesday and Saturday will now be my regular posting days. That appears to be the pattern for the past couple of weeks and I'm pretty comfortable with it...at least until my school schedule gets out of control. Hopefully that won't happen though! :) Also, as of this moment, I'm only 80  away from an indie giveaway! YAY!

So I wasn't crazy about this mani. It looked waaaay better in my head. I've been wanting to do some nail art but I've been too busy. I saw a gorgeous picture on Pinterest of a gold polish with white crackle over it. I know everyone seems to hate crackle now, but it still doesn't bother me. I decided to recreate the photograph. I don't know what this issue was, but I was not crazy about the way it turned out. The gold wasn't as sparkly once the crackle was over it, which was disappointing. However, the gold was gorgeous on its own and it seems like it'll be a great Christmas-y polish. Anyways, I used China Glaze Ultamate Holiday (2 coats) and OPI White Shatter. Ultamate Holiday is a polish that was exclusive to Ulta this past Christmas. It's a beautiful gold fine glitter with holo glitter throughout. You can really see the holo glitter in the blurred nails in the first picture. LOVE IT. And I don't even usually like gold! Sorry this mani isn't as exciting as usual, but try to enjoy it nonetheless! :)

China Glaze Ultamate Holiday

OPI White Shatter

Gold with White Shatter

Saturday, September 1, 2012

Jelly Sandwich Brilliance!

I LOVE GLITTER. Phew, I said it. I feel so much better. :) When Essie added Stroke of Brilliance to their Luxeffects collection, I knew I HAD to have it. And thanks to Copious, I purchased it for one cent! I already owned Set in Stones and A Cut Above, and they are some of the best glitters...ever. I even used Set in Stones in my first jelly sandwich ever! They have large and small hexagonal glitter as well as tiny glitter. Also, one coat is more than enough to add glittery gorgeousness to any manicure. It is not sparse by any means. The blue of Stroke of Brilliance is beautiful. It's almost a periwinkle color and I just love it.

Before I got Stroke of Brilliance, I purchased OPI Don't Touch My Tutu because I feel like a good white jelly is priceless in any polish collection. I knew these two polishes had to be combined into a jelly sandwich. They are seriously amazing together. I used two coats of OPI Alpine Snow, one coat of Essie Stroke of Brilliance, and one coat of OPI Don't Touch My Tutu for this jelly sandwich. I LOVE IT! Enjoy! :)

Essie Stroke of Brilliance Jelly Sandwich

Essie Stroke of Brilliance

Essie Stroke of Brilliance

Newer Posts Older Posts Home