Sunday, July 29, 2012

Watermelon Nails!

Did you miss me? ;) I'm behind in my manicure schedule for two reasons: 1) School is kicking my butt and 2) I did a guest blog post, thus taking up manicure time! I generally change my nails every 4-5 days, but creating a manicure for my guest post set me back a bit since I can't share that one with all of you yet! I'll post a link when it goes up in August...it's awesome! Hehehe!

I finally got around to doing some nail art that I've been contemplating for awhile. Watermelon nails! Does anyone else mull over nail art ideas for some time until you can picture exactly how you'll do them in your head? I hate sitting down without a game plan! And my perfectionism doesn't help the cause...I must have thought about these for a month or so. Anyways, these are the perfect summer nails because they're seriously juicy looking! I started out by polishing my nails with OPI Alpine Snow. Then I used China Glaze Smoke and Ashes (my new favorite black?) and an orange stick to create seeds by placing a dot and then dragging it down a bit. This only worked because I used a jelly polish over the seeds. If you don't use a jelly, you'll need to do the seeds AFTER your watermelon color! Notice I left room at the bottom for the rind? :)

Watermelon Nails

Watermelon Nails

Then I placed striping tape just below the seed line. I polished Zoya Kate (Birchbox) above the striping tape and Zoya Ivanka below the striping tape. Afterwards I pulled the striping tape off and viola! Juicy watermelon nails! Enjoy! :)

Watermelon Nails

Watermelon Manicure

Watermelon Manicure

Tuesday, July 24, 2012

Dr. Seuss Nail Contest

I've seen plenty of nail art contests on Facebook and blogs but I've never entered one. This is for two reasons. One, none of them have ever intrigued me that much. Two, I'm really critical of my own work (and perhaps a little sensitive). However, when I saw  nail art contest, I knew I HAD to give it a shot. It's a Seuss contest. I LOVE SEUSS. He is my favorite children's author and I absolutely love reading his books to my class. I've been wanting Whimsical Ideas by Pam's Seuss polish for FOREVER. I'm also very into recycling. I began the recycling program at my school and I'm sure my husband could tell you how crazy I am about it at home. 

So, that makes my all-time favorite Seuss book The Lorax. It gives me goosebumps every time I read it. I usually want to cry, too! Anyways, I knew I had to create Lorax nails immediately. I never re-do my nails until they chip so I purposely chipped my Floam nails so I could do these! Every single thing was hand painted. No stamping, tape, or anything else. If you're unfamiliar with the story, my thumb is the Once-ler (polluting jerk!), my index, ring, and pinkie fingers are Truffula trees (which are destroyed in the story), and my middle finger is The Lorax (my hero!). After I finished my nails, I took pictures and then I mattified them. I actually prefer them more after they were made matte! No matter what happens with the contest, I love these nails and I'm excited to put some of my work out there! For this manicure, I used Zoya Yummy, Zoya Arizona, Zoya Shelby, China Glaze Mahogany Magic, China Glaze Smoke and Ashes, China Glaze Lemon Fizz, China Glaze Kalahari Kiss, OPI A Grape Fit, and OPI Alpine Snow. These pictures were taken indoors on a cloudy day without flash. Enjoy! :)

Dr. Seuss Nails

The Lorax Nails

Once-ler Nails
 The Once-ler hiding behind his boarded up window. We never see more than his eyes and arms in the book...
The Lorax Nails


The Lorax Nails


Friday, July 20, 2012

FLOAM!

I know I'm a little late to the Floam bandwagon, but that polish is SO HARD TO FIND! I finally scored it on Ninja Polish a few weeks ago because we were going to visit family and the 20 hour car ride afforded me plenty of internet stalking time! They also happened to be re-stocking that day/night! I wasn't sure if I'd even like Floam, I just knew I HAD to have it! If you've never heard of Floam, it's matte blue and yellowish green glitter in a clear base!

Since I've been on a nail art kick, I had to spice Floam up a bit. I decided upon a laser mani, which I've been meaning to try for months! I polished my nails with OPI Alpine Snow first. Then, I randomly stuck striping tape all over them, four pieces on each nail. I put the Floam on one nail at a time. Before putting it on, I looked at the tape to see which order to pull the pieces off in so one piece wouldn't rip another one off. Be sure to do that! :) After one coat of Floam, I pulled the striping tape off and here's what I ended up with! I LOVE IT! I finished it off with a coat of Revlon Colorstay topcoat to smooth the texture down a bit. These pictures were taken indoors in natural lighting on a partly sunny day!

Floam

Floam Nail Polish

Floam Nail Polish

Floam Nails

Wednesday, July 18, 2012

The Giveaway Has Ended!


Edited on 7/19/2012 to show the winners! 


Congratulations to the winners!
a Rafflecopter giveaway
If you didn't win, don't worry! I'll have another giveaway very soon! I have some REALLY awesome prizes for the next time around! :)

Tuesday, July 17, 2012

Polish Shoes Kick My Butt :)

Be sure to enter my first giveaway! It ends Wednesday night!

I saw a pin on Pinterest several months ago of nails that had been polished in several different colors and then made to look like Chucks. Not going to lie, I'm not a huge fan of Converse shoes BUT I wanted to try the manicure myself based on the popularity of that particular pin and the fact that I've never seen any other similar pins. 

I polished my nails white with OPI Alpine Snow. Then, I used hole reinforcers and I stuck them to the tips of my nails to create the half moon. I then polished my nails with Zoya Michelle. After that, I used my black and white striping polishes to put on the details. Holy. Time. Consumption. These turned out really cute, albeit a little sloppy, but they took so much time to do! However, I really enjoyed how it looked like my fingers were wearing little shoes, hahaha! :) Despite the many compliments I received, it may be a LONG TIME before I attempt this one again! These pictures were taken indoors in natural light on a partly sunny day! Enjoy! :)

Converse Nails

Shoe Nails

Chuck Nails

Saturday, July 14, 2012

Rainbow Honey Equestria Collection

The indie bug bit me recently and I've since gone crazy getting indie polishes! One of the brands I was most excited about is Rainbow Honey. After looking up swatches on their Facebook page, I decided I must have A Little Kindness and The Element of Magic. And then their shop opened. And I wanted them ALL. So I bought the whole set of mini polishes (and one more for the giveaway) and anxiously awaited their arrival. When they came in, I knew I had to try them all immediately. I then embarked upon my first full collection swatch extravaganza. I like to call it flash swatching since it's a frenzy of polish, cotton balls, remover, and in this case, tin foil. It all happened very quickly and when it was over I was left with a giant pile of removing remnants and lots of pictures. Some weren't my best work, but oh well! Also, because I was swatching and removing polish so furiously, I wasn't polishing my entire nail (save the cuticles!). The most surprising thing to me was that the polishes I thought would be my favorites weren't my favorites at the end! However, every single one of these polishes is GORGEOUS. Before moving on to the pictures, I find it important to say that I purchased these polishes on my own. These pictures were taken indoors in natural lighting on a cloudy day. Enjoy! :)

There is one coat of polish over OPI Black Onyx (Middle Finger) and OPI Alpine Snow (Ring Finger). My pinkie has one coat of the polish by itself and my index finger has a complementary polish on it to match the Rainbow Honey polish. The complementary color also has one coat of the Rainbow Honey polish over it.

Rainbow Honey has the CUTEST packaging!

The whole collection!
20% Cooler and Mare of the Moon 

Pinkie Promise and Celestia

The Element of Magic and A Little Kindess

The Worst Possible Thing and Hoof Wrassle

A Little Kindness
Complementary Polish-China Glaze Lemon Fizz
I love how this looked over black! 

20% Cooler
Complementary Polish-Zoya Zuza


Celestia
Complementary Polish-OPI No Room for the Blues


Mare of the Moon
Complementary Polish-Zoya Kotori
 This one has little moon glitters in it. Let me tell you, I fished and fished and fished for a moon. I finally found ONE, after several fishing trips, and it's only because it got stuck in the bristles of the brush, hahaha! 

Pinkie Promise
Complementary Polish-Zoya Happi
 This one has bar glitter in it, too, but it is harder to see in the pictures. 

Hoof Wrassle
Complementary Polish-Zoya Coraline
This was my least favorite, but maybe because I'm not a huge orange fan. I would definitely wear this in October, though! 

The Element of Magic
Complementary Polish-Zoya Zara
Love this over black!

The Worst Possible Thing
Complementary Polish-Zoya Skylar
MY ABSOLUTE FAVORITE! I must buy a full size asap!


Wednesday, July 11, 2012

Plaid Manicure Tutorial!

First of all, if you haven't entered my giveaway, go enter it now! :) Next, let me just say how happy I am to have my camera cord back! YAY! Ok, onto the mani!

I am impressing myself with remembering to take pictures throughout the manicure process! Woo-hoo! When the husband and I went to Monster Jam in February, I knew I needed some awesome nails to go with our outfits (yes, we dressed up!)! He wore a blue and red plaid shirt so I used that for my nail inspiration. Here's what I ended up with:

Plaid Manicure

However, I did this before the blog, so I decided to recreate it for you guys with some summery colors! Whatever color you want to be the middle stripe is the color you begin with. I chose Julep Courteney and polished on two coats. 

Julep Courteney

Let your base coat dry for a good amount of time. Then, using scotch tape, cut the size you want your middle stripe to be. Be sure you stick the tape to your hands several times before you place it on your nail to prevent peeling! :) Smooth out any bubbles in the tape. Stick the tape to all of your nails so you aren't fiddling with tape with wet nails!

Plaid Manicure

Choose your next color and polish it over your nail and the tape. I used Zoya Shelby! 

Plaid Manicure

Polish one nail at a time and immediately pull the tape off. If it doesn't come off absolutely perfect, it's ok! You can cover up most imperfections with the striping tape!

Plaid Manicure

Finish the rest of your nails in the same fashion! You can see I had an uneven line on my index finger and middle finger, but I covered it with striping tape just fine! 

Plaid Manicure

Get the striping tape of your choice. I used silver. 

Striping Tape

I always start with the vertical stripes. Put the tape along the border of the two colors on the side where you have more of the second color. Does that make sense? For example, on my middle finger, there was more pink on the right, so I placed the striping tape on the right side of the green stripe. Then, place another piece of tape right next to the first piece so you have two vertical pieces of tape on your nail. Then, do two horizontal stripes wherever you fancy! I like to alternate between the top of my nail and the bottom of my nail! :) Yes, I do this all by myself with no assistance! It might frustrate you at first, but you'll get better and better at it, I promise! When you're done, you'll have striping tape tails all over the place! 

Plaid Manicure

Clip the tails off as close to the edge of your nail as you can. I use angled nail clippers and they are wonderful! And Viola! Plaid nails! Finish up with a thick topcoat to keep that tape firmly in place! I can usually get a striping tape manicure to last 4-5 days! Enjoy! :)

Plaid Manicure

Plaid Manicure

Plaid Manicure

And finally, my little window thief! :)


Monday, July 9, 2012

My First Giveaway!

All I can say is WOW! I am so overwhelmed and excited by the increase in my Facebook fans over the past day thanks to Jen at ! I went from 47 likes to 73 (as of right now!) and I couldn't be happier! I'm really just excited to share my nails with everyone because I love my hobby so much! Anyways, enough of my blabbing! I promised a giveaway at 50, so here it is!

The giveaway will be open until Thursday, July 19th at 12:01am. So basically, get your entries in by Wednesday evening. I know the giveaway will be open for awhile, but I had to take my school schedule into consideration so as not to overwhelm myself with homework AND checking entry validity AND mailing prizes! :) Plus, this gives everyone plenty of time to enter! 

At this time, the giveaway will only be open to those living in the contiguous United States. I haven't had enough experience shipping overseas and to Alaska and Hawaii to feel comfortable with it yet. However, I hope to be able to hold future giveaways internationally. :) I will contact you via email if you win. You will have 48 hours to email me back your address before forfeiting your win. Depending on the order the winners are picked in, I will try to give you your first choice (which is a question below) of the prizes. Please understand that I only have one of each prize though! :) If you have any further questions regarding the giveaway, be sure to read the Terms and Conditions at the bottom of the Rafflecopter widget. If your question isn't answered there, email me at and I'll get back to you as soon as possible! If you post a comment under "Anonymous," be sure to leave your name with it or I won't know who left the comment! Also, this is my first Rafflecopter experience, so forgive any issues I may have! :)

Now that the boring stuff is out of the way, onto the giveaway! There will be three prizes for this giveaway since you guys blew my mind with all of the likes on Facebook! I had planned on having swatches and such, but the quick timeframe and shipping constraints have prevented that, so please google swatches if you'd like to see the lovelies I am giving away! Enjoy! :)

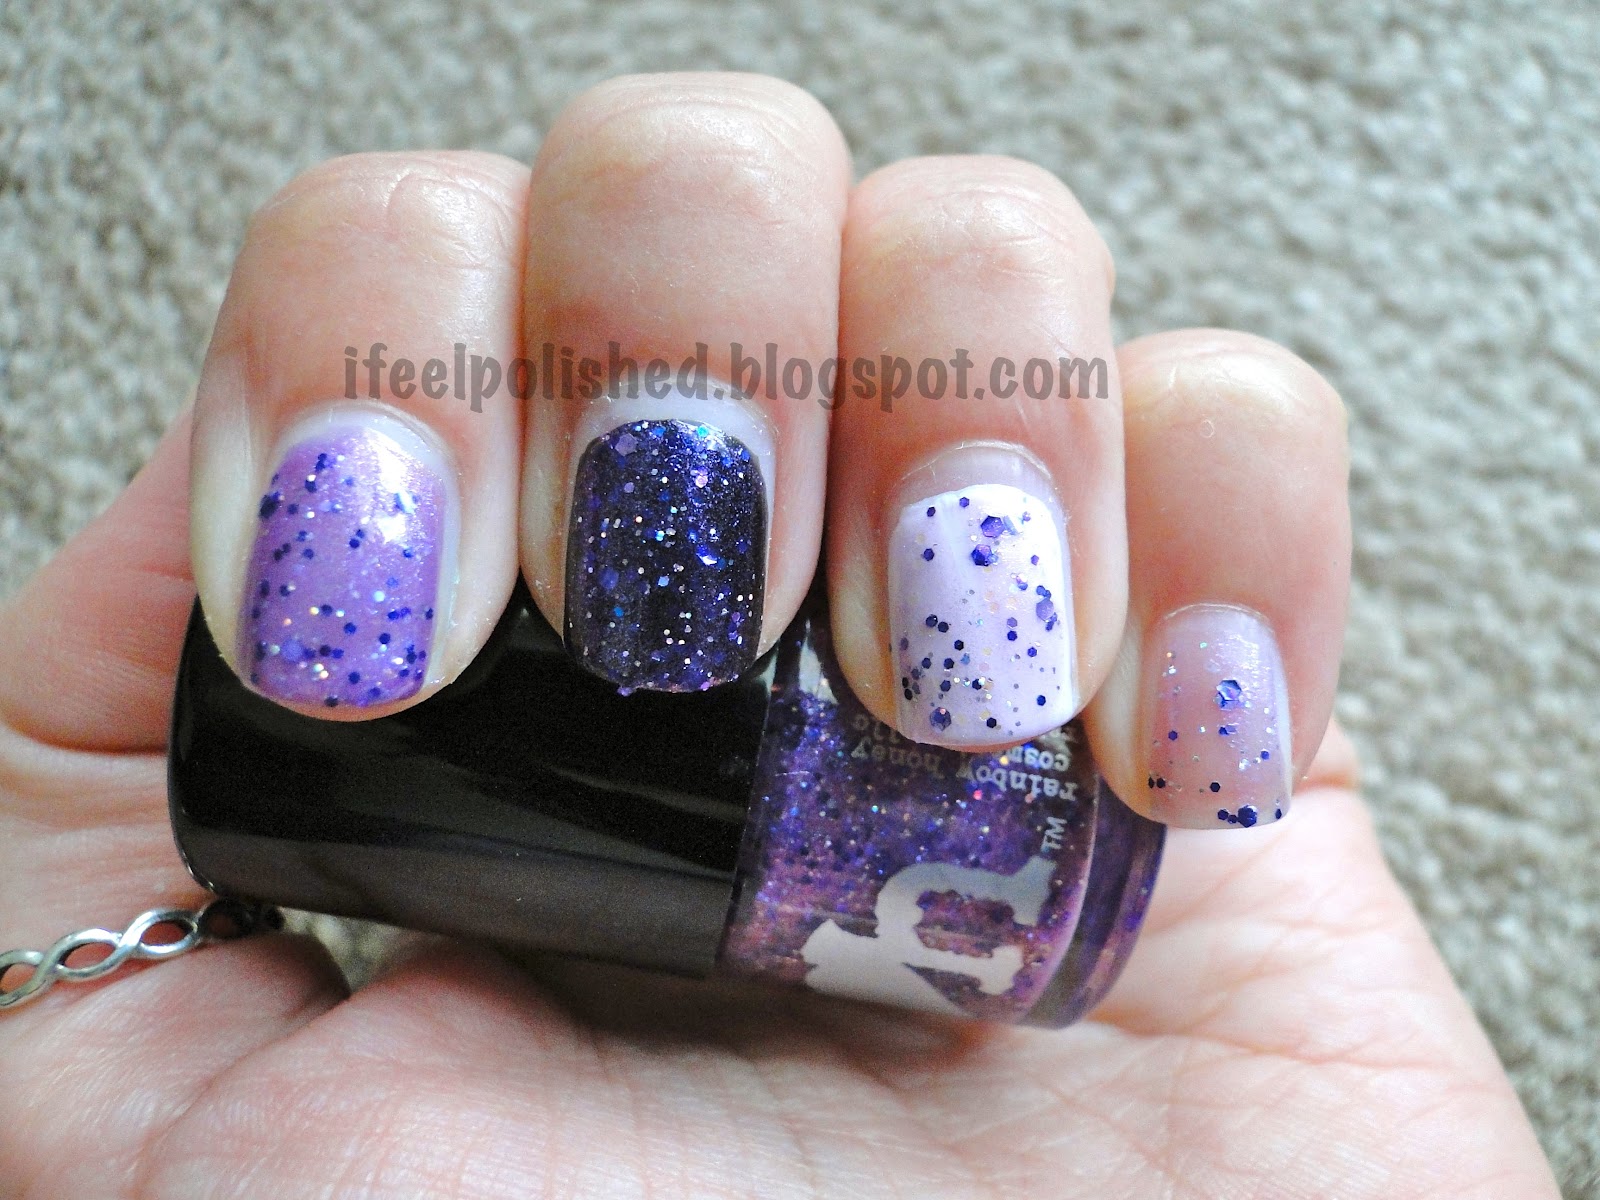
Prize #1-The Rainbow Honey Prize
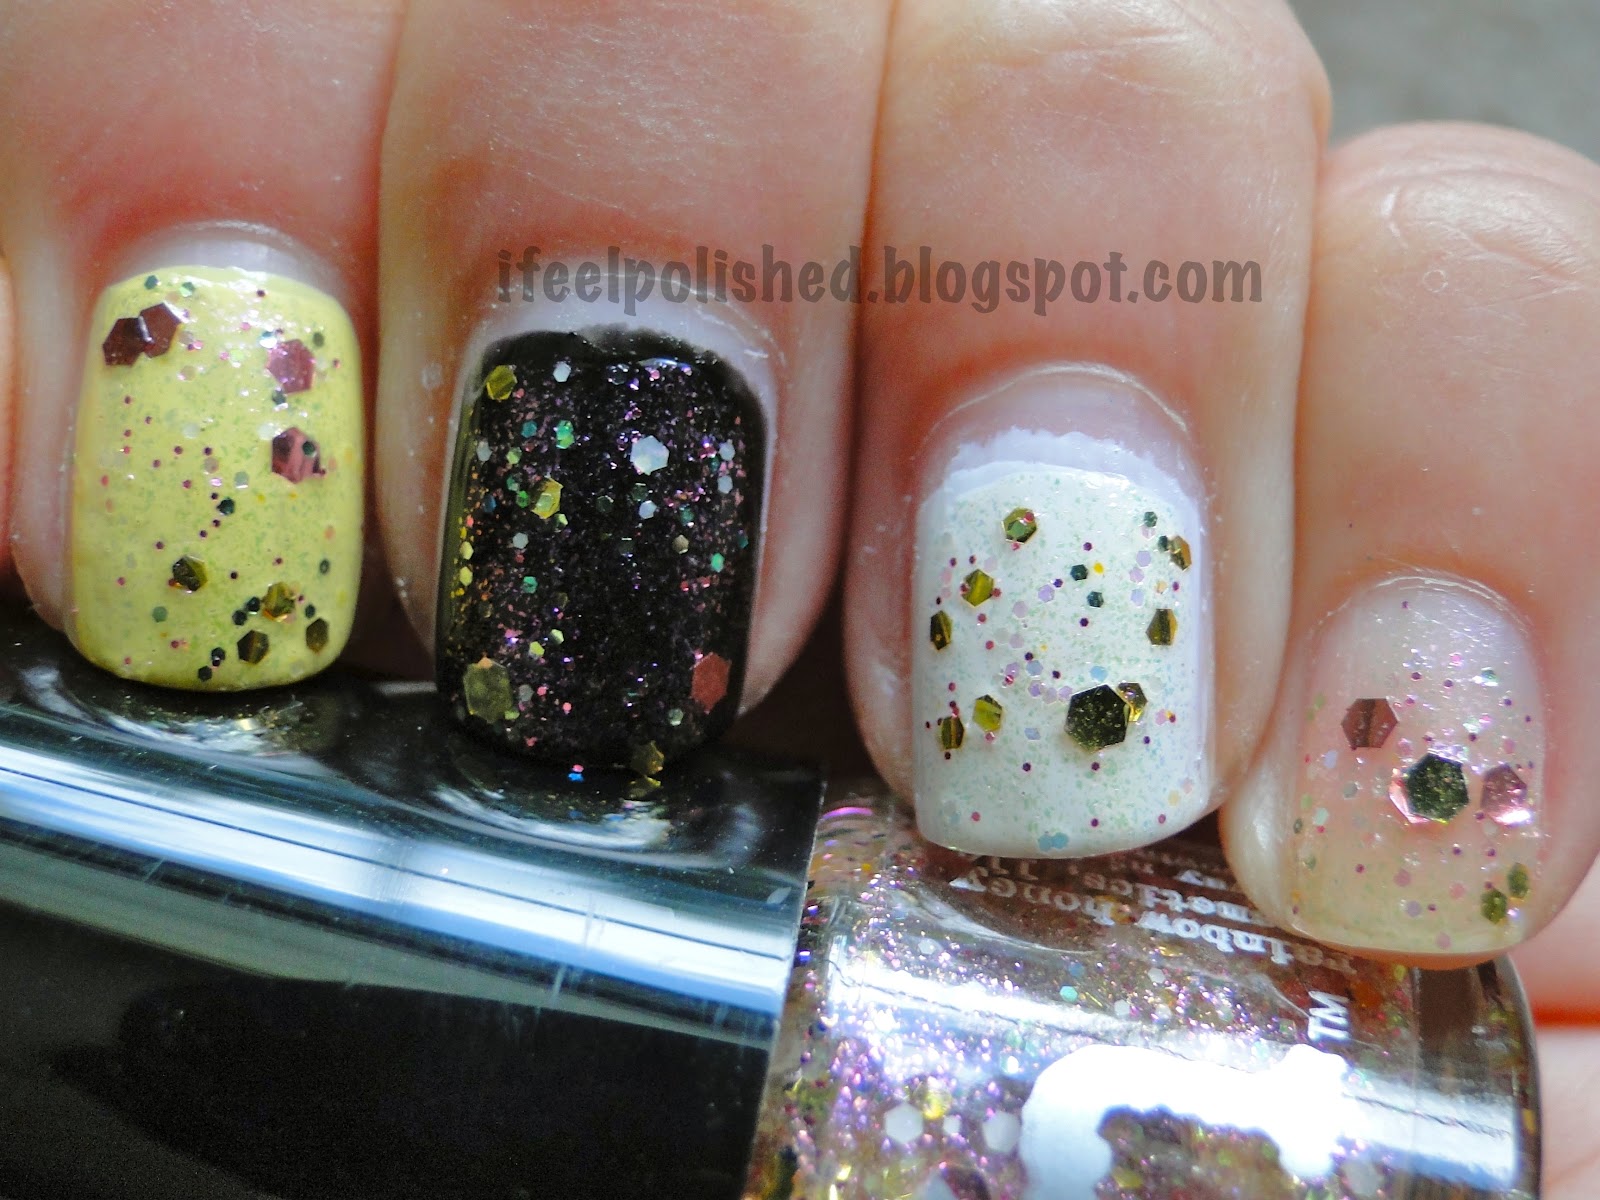
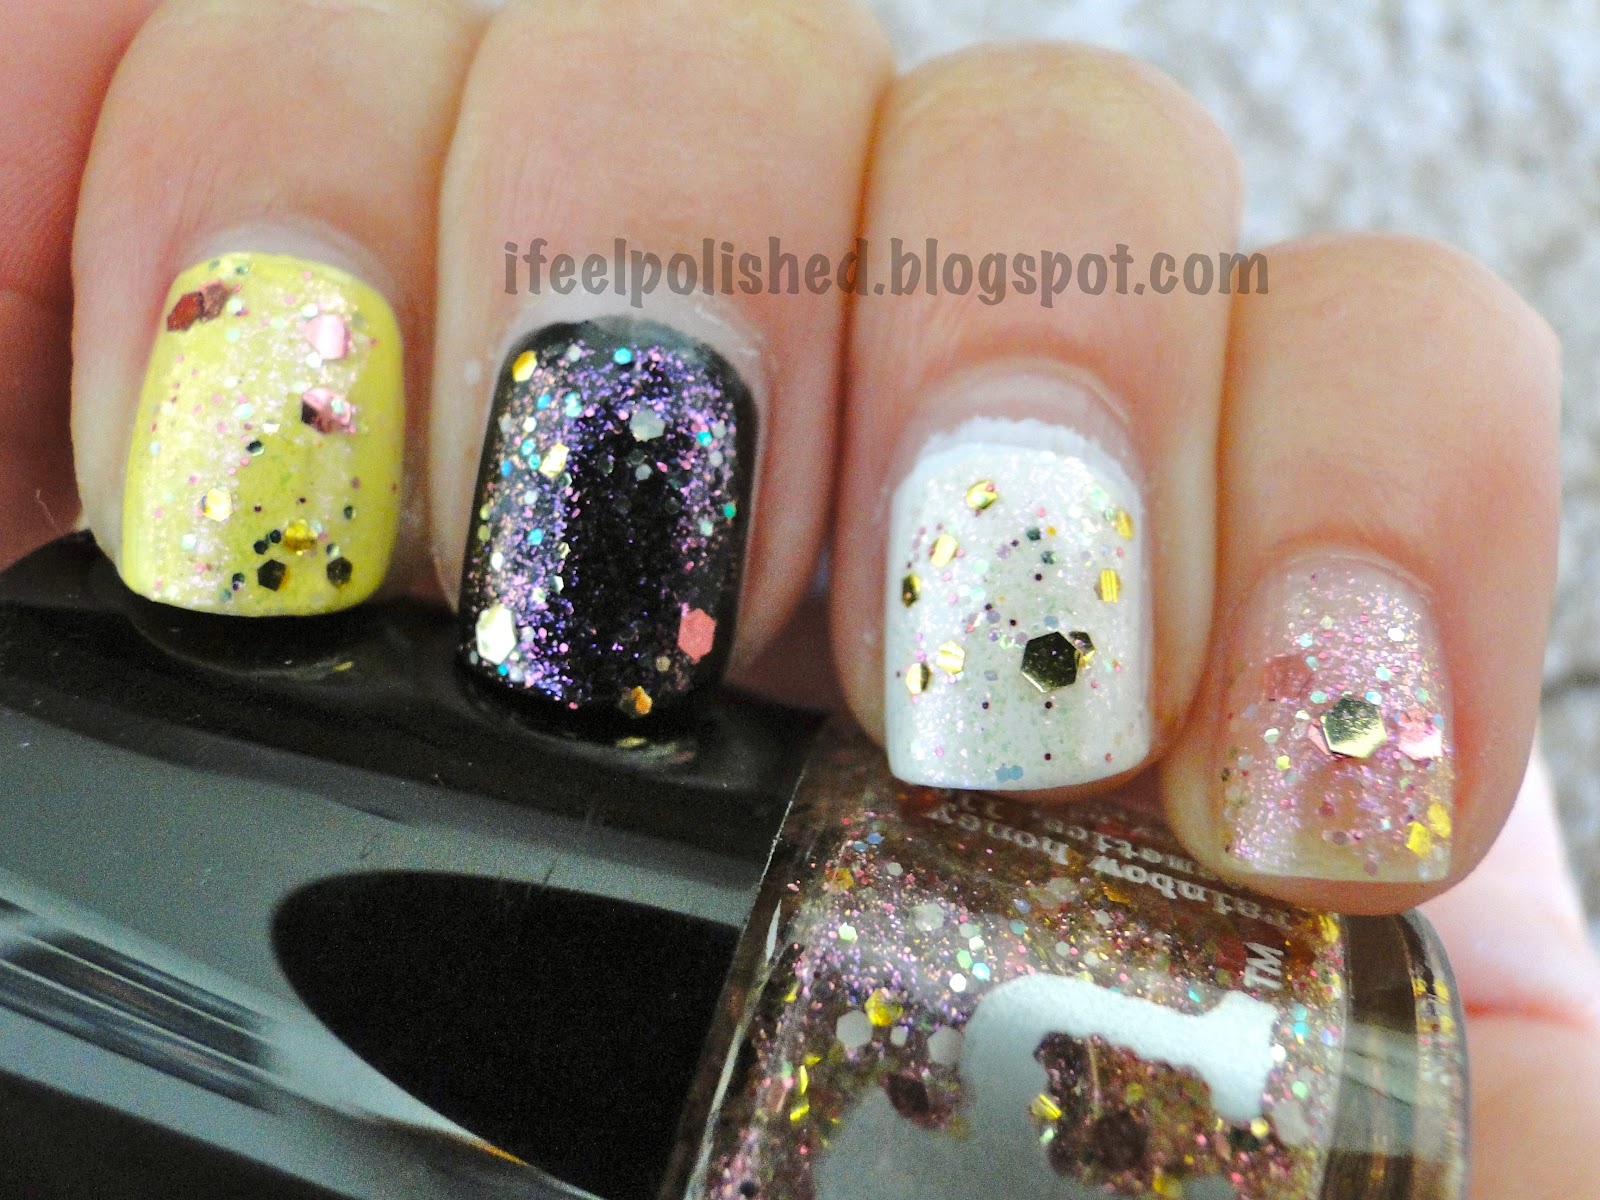
Rainbow Honey is an indie brand that makes gorgeous glitter polishes. If you win this prize, you will receive a 7mL bottle of Rainbow Honey 20% Cooler (a gorgeous sheer blue polish with a rainbow of glitter in it) and a mini Tropical Shine 4-way file, one of my favorite nail files! I apologize for the poor picture quality. I wanted to get a quick swatch but a thunderstorm rolled in and stole my natural lighting! I used my own bottle of 20% Cooler for the swatches...the prize is brand new! 


 One coat of 20% Cooler over Zoya Zuza, OPI Black Onyx, OPI Alpine Snow, and one coat by itself! 


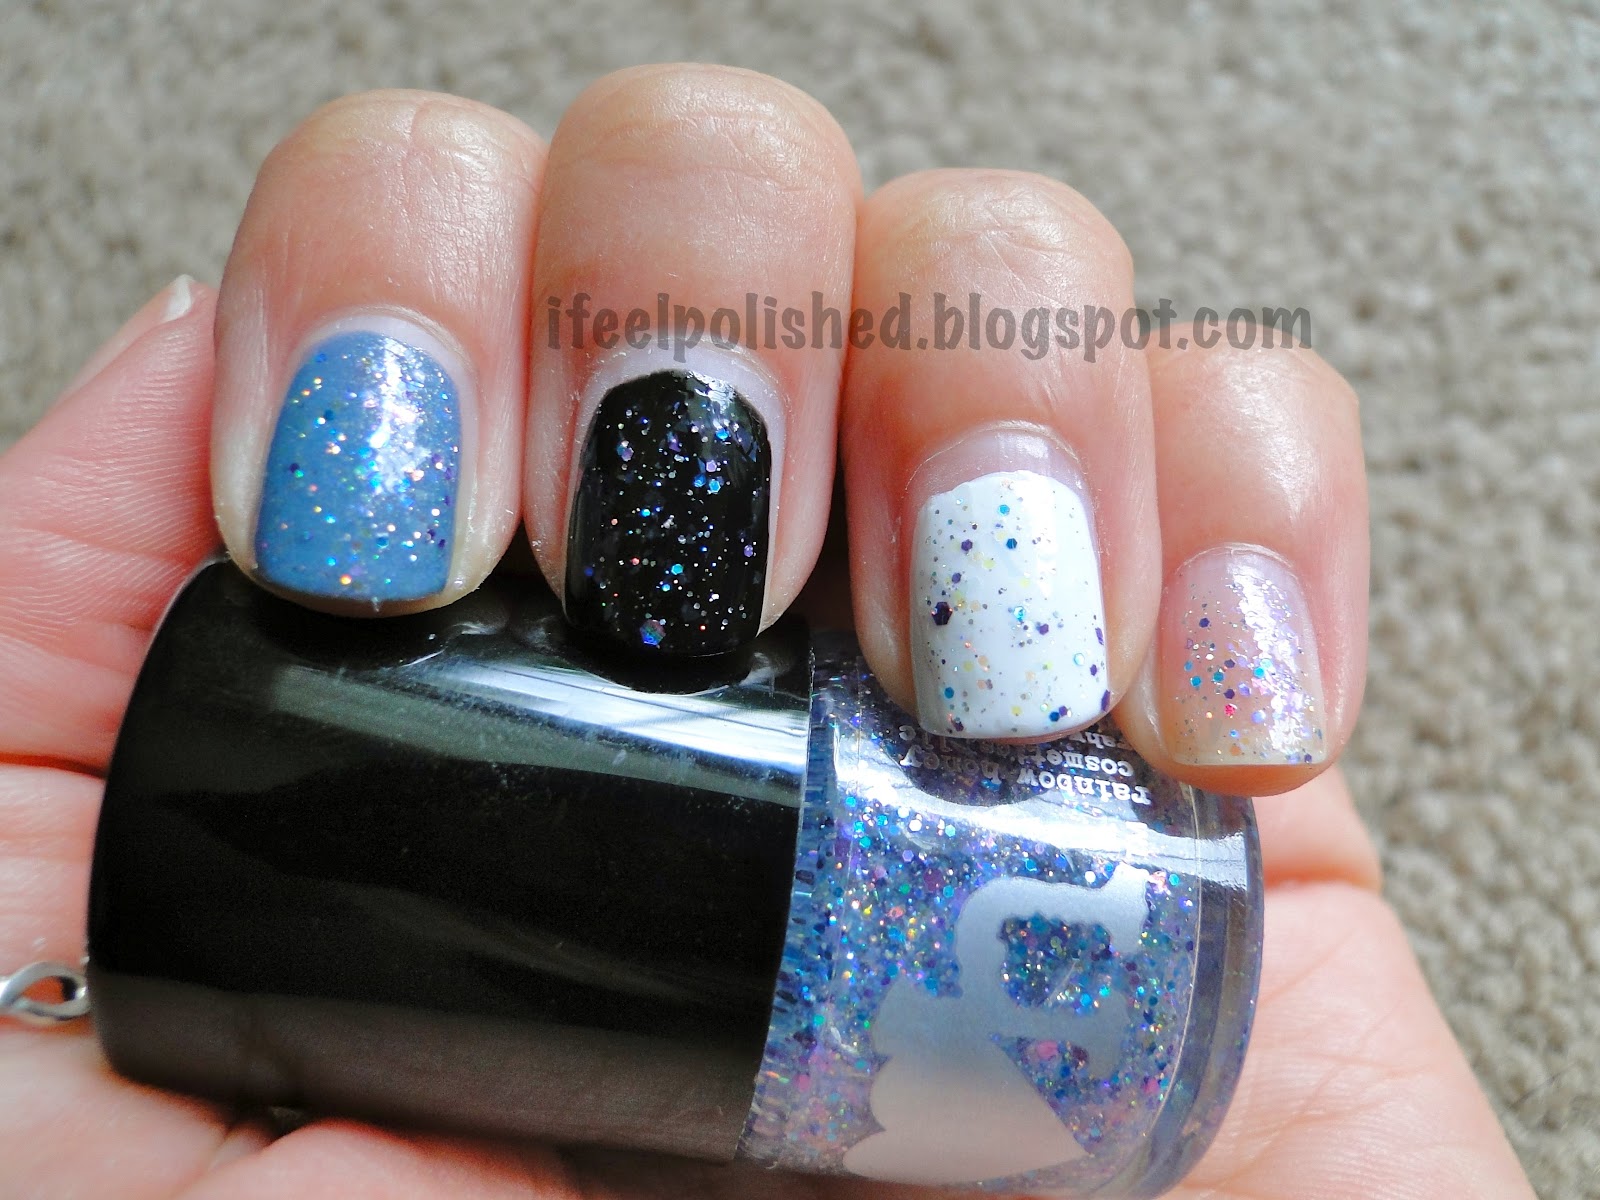
Prize #2-The Silver Prize
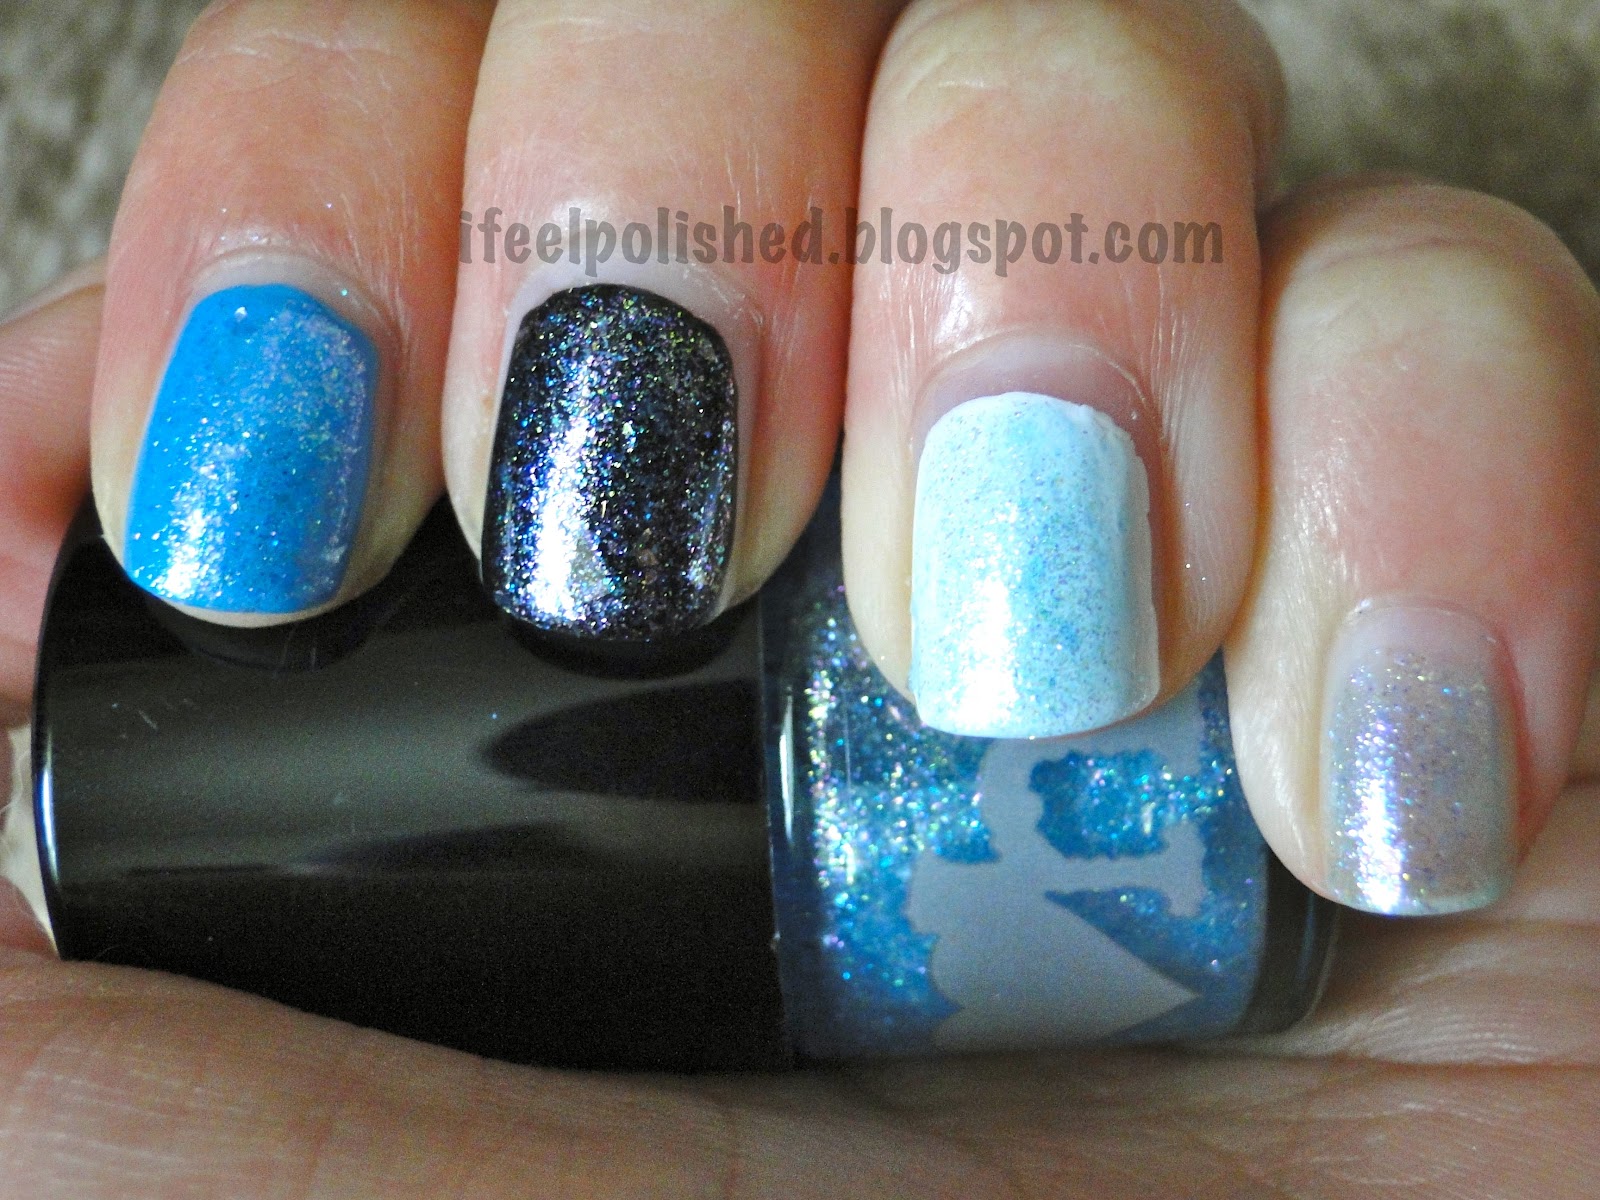
This prize includes China Glaze Hook and Line from The Hunger Games Collection and China Glaze Polarized from the Prismatics Collection. Hook and Line is more pewter, but it turned out really brownish looking in the photo thanks to my phone (stupid camera cord)! :) Polarized is a fine silver glitter with larger rainbow glitter pieces in it. I love Polarized because it's practically a one coat glitter! Seriously, one coat and it has nearly full coverage! A mini nail file is also included with this prize.


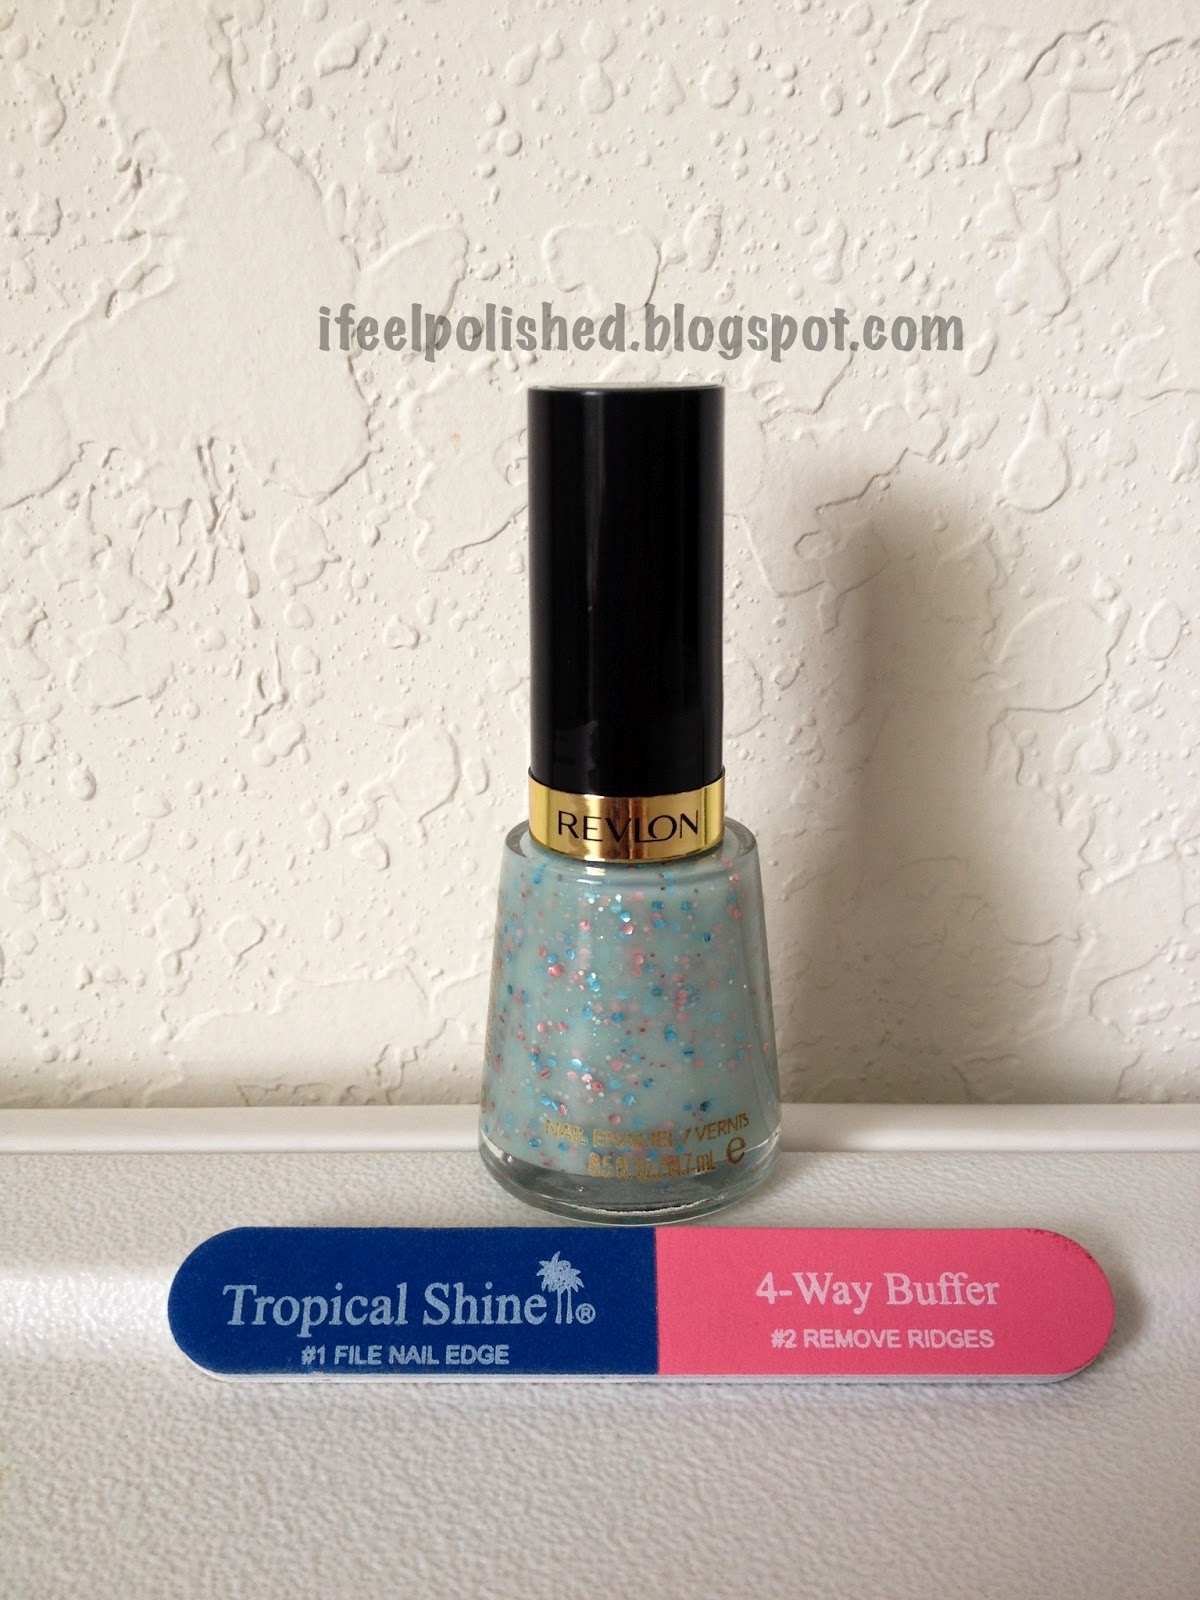
Prize 3-The Whimsical Prize
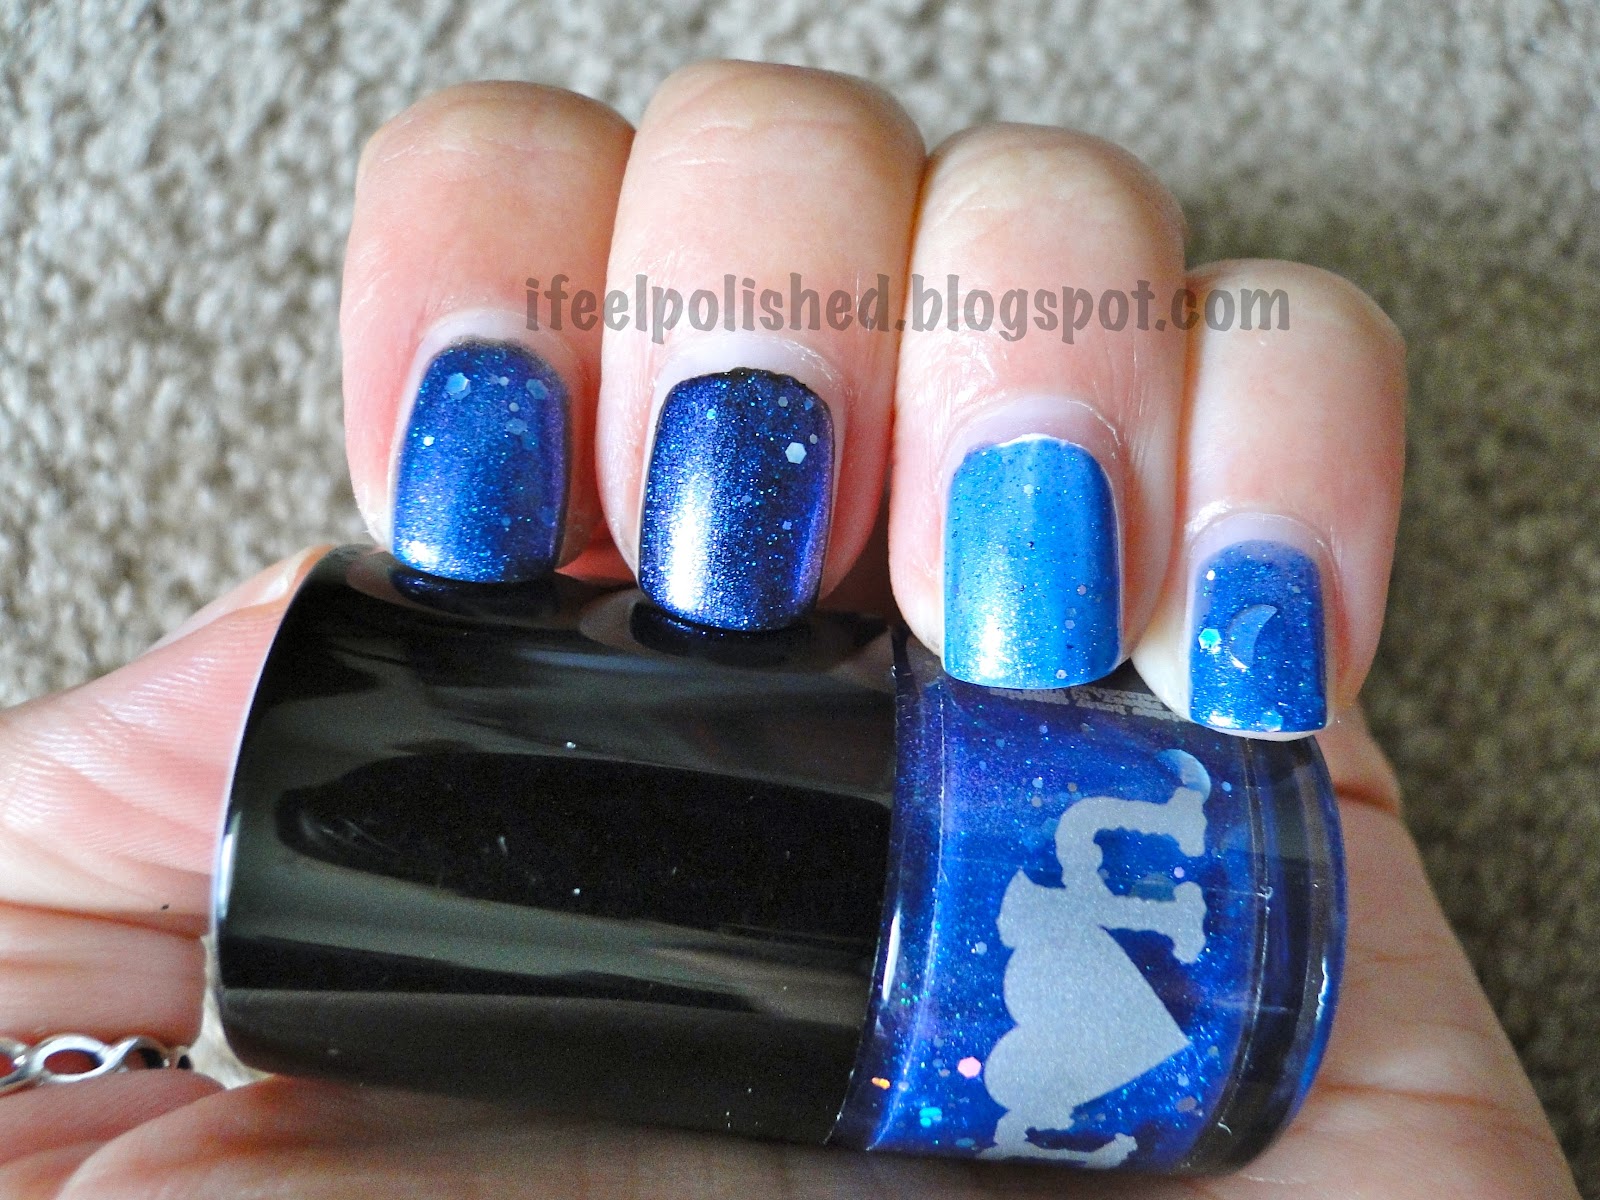
This prize includes Revlon Whimsical, which is a great sheer blue polish with pink and blue glitter in varying sizes. It has become increasingly hard to find recently, too! This prize also comes with a mini file. For the swatch below I used it over China Glaze For Audrey and OPI Aphrodite's Pink Nightie. 


a Rafflecopter giveaway
Newer Posts Older Posts Home