Saturday, March 31, 2012

Lorelei's Tiara and Tampa Bay Lightning!

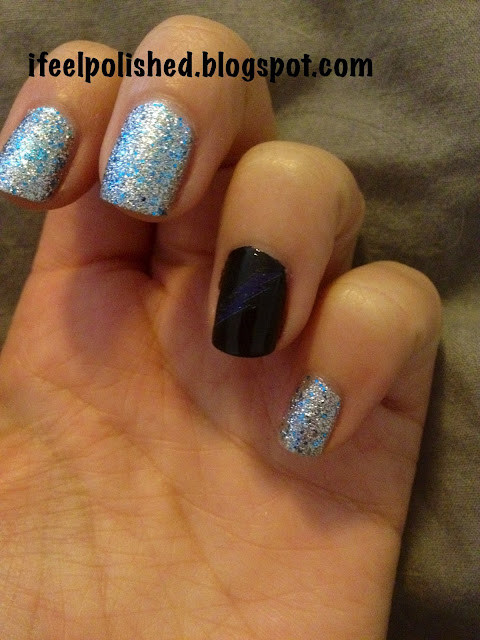
I am, admittedly, a very girly girl. I love clothes, makeup, shopping, and of course, nail polish. I also dislike most sports, with the exception of baseball and hockey. I like baseball in limited quantities and only when I'm watching it live. Watching baseball on TV is nearly equivalent to watching golf, in my opinion. Hockey, however, is a completely different story. I LOVE HOCKEY. It has actually turned into more of an obsession. My husband and I moved to Florida from Hockeytown itself, so he has always been a diehard Red Wings fan. I grew up watching and enjoying the Red Wings, but never getting into them nearly as much as my husband. Sadly, Florida is not nearly as intense with hockey as Michigan is. But, the Tampa Bay Lightning play close to where we live, and after they went to the Stanley Cup Playoffs last year, we got sucked in and turned into fans. My husband still LOVES the Red Wings, but for me, the Lightning was the first team I really got into, and therefore, they are my first true love. We have season tickets and we only miss a game if I have class. Sadly, they won't be making it to the playoffs this year, so with only two home games left in the season, I knew I wanted to do Lightning themed nails. Let me just start by saying this was much easier said than done. My ideas of grandeur were not as easily translated onto my nails as I had hoped. I tried numerous techniques for creating a lightning bolt decal. I tried cutting a bolt out of tape, I tried creating my own decal using a plastic baggie, and I even tried hand painting one. I was about to throw in the towel when my husband reminded me of the bolt nail tattoos I had. They're dark blue, but they would make it easier to hand paint the bolt. Needless to say, this manicure isn't exactly what I envisioned, but it's close enough. I used China Glaze Lorelei's Tiara, OPI Black Onyx, and OPI DS Radiance. 

Lorelei's Tiara is a glitter packed polish that was opaque with one coat! WOW! I was impressed since I'm used to many coats of glitter polish that still wind up sheer. However, I know it's going to be a nightmare to remove! Foil method, here I come! Anyways, I did two coats for good measure. This polish was perfect because the Lightning's team colors are blue, white, black, and silver! I used two coats of Black Onyx on my ring finger. Then, I added my nail tattoo. It's hard to see because it's dark blue, but it's there:

Lorelei's Tiara

Then, using an orange stick, I carefully traced the decal with Radiance. After that dried, I added some of Lorelei's Tiara to get blue sparkle onto the lightning bolt. And here's what I wound up with! Not my favorite, but I'm pleased with how it turned out after the headache of trying to figure out how to create the lightning bolt! Here's my Tampa Bay Lightning manicure!

Lorelei's Tiara

China Glaze Lorelei's Tiara

China Glaze Lorelei's Tiara

China Glaze Lorelei's Tiara

Tampa Bay Lightning Nails

Tampa Bay Lightning Manicure

On another note, I've recently decided that I'm adding Zoya polishes to my list of favorite polishes. It takes a lot to make it to that list and so far, it's just OPI, China Glaze, and Zoya. I do own other brands, but I haven't used them enough to consider them a favorite. I went from owning no Zoya's to owning 6 a few weeks ago when Zoya offered a buy 3 get 3 free promo on Facebook. Since then, I've been stalking their Facebook, keeping my eye out for another deal. Well, I guess Good Morning America did something with Zoya recently and there were comments all over their Facebook page about it this morning. I did some digging and apparently Zoya teamed up with GMA to offer 50% off select Zoya packages! Until supplies last, you can get the 50% off! Here's the link to the beauties I ordered today:
Just enter GMAZOYA as your promo code! You can also search GMA to see some other sets they have left for 50% off. 
Wednesday, March 28, 2012

Zoya Happi Makes Me Happy!

Zoya Happi was one of the new pretties I bought last week. It's a member of their Reverie Collection, which are all duo-chromes. The duo-chromability (yep, I just made that word up!) isn't as dramatic as I've seen before, but I still love the color. I like to call this color Barbie pink and it shifts to gold depending on how you look at it. My experience with Zoya thus far has been that it goes on smooth and wears the same as my trusted, tried, and true brands of China Glaze and OPI. I've heard that Zoya can chip easily, but that hasn't been my experience. I can easily get 5-7 days of wearability out of their polish as long as I use a base coat and a top coat, which I ALWAYS use anyways, no matter what polish I'm using. 

Alright, onto my manicure. I used Zoya Happi and OPI DS Coronation (along with my base and top coats). I don't know about you, but I'm pretty much IN LOVE with holographic nail polish. My collection of them is seriously lacking, in my opinion, but I just adore how they look. I can't help but stare at my nails when I have a holo polish on, especially when I'm in the sunlight. Even my students love it! :) It's truly mesmerizing and Coronation was a perfect accent nail for this manicure. I also added a Happi heart using a dotting tool. Enjoy!


Zoya Happi


Zoya Happi


Zoya Happi


Zoya Happi

Valentine's Day Nails


Valentine's Day Nails


Valentine's Day Nails

Saturday, March 24, 2012

Zoya+Nail Stamping

I finally took my Hunger Games polish off, which was practically a workout because of all that glitter! Though the tinfoil method helped, I still ended up having to scrub off some of the glitter. Once I was done, I definitely wanted to try out one of my new Zoya's! I chose Lana, a reddish orange duo-chrome. The duo-chrome is pretty subtle with Lana. She mostly exudes the reddish orange feel, but in some lights, she definitely has a gold-tone to her. Even though she wasn't as duo-chrome as I had hoped, I still love the color and look! I tried to capture the different colors of Lana, but it was difficult! 

Zoya Lana

Zoya Lana

Zoya Lana

Zoya Lana

I couldn't just be done once Lana was on. That would be too plain and boring for me! So I went through my pins on Pinterest and found a really cool manicure with a lacy stamp. Then, I went through my Shany stamps and sure enough, SH21 has a perfect lacy design on it. If you've never tried stamping, I'd highly recommend it! The possibilities are endless and it's so easy to do! All you do is put polish on the stamp, scrape off the excess, dab it with the stamp, and roll it onto your nail! Perhaps I'll post a tutorial on stamping another day...anyways, that being said, I am a perfectionist and a tiny piece of polish from my stamp ended up away from the stamped design on my middle finger. UGH. Oh well, I know it's probably not terrible and I just need to get over it! :) I used OPI Black Onyx for the stamp, finished with Essie 3-way Glaze, and here's what I ended up with:

Lace Nails

Delicate Nails

Lacey Nails

Lace Stamp Nails

Lace Stamp Nails

Doily Nails

Monday, March 19, 2012

DIY Nail Polish Rack!

I began a small, modest collection of nail polish about five years ago. I kept them in a Rubbermaid caddy with a neat little clip-on top. However, when my hobby became a full-blown addiction, my sad little caddy lost the top, which eventually would have been rendered useless anyways. I knew I needed a new way to store my polishes. I wanted to purchase a rack, but those suckers are CRAZY expensive! Enter: husband. Now, my husband is in the IT field, but he is pretty handy with tools, so off to Home Depot we went. If you are in need of a polish storage solution, I highly recommend requisitioning someone to build you a polish rack (or build it yourself!)! We bought primed 1" x 2" lumber, which was 8' long. The dimensions of the rack are 4' x 2' with about 4" in between each shelf, which leaves my collection with plenty of space to grow! My collection of 80 or so polishes actually looks really small! We bought six 8' pieces of lumber, but only ended up using five of them. They are pretty cheap and after purchasing paint, brushes, and screws, my rack ended up costing just shy of $30. The deal was that the rack had to be in an out-of-the-way location, so the closet was chosen. While the location is perfect, getting a picture of it was DIFFICULT, so here is the best I could do: 

DIY Nail Polish Rack

In other news, Zoya had an AWESOME deal last week, buy 3, get 3 free! I've been following them on Facebook ever since I saw some swatches of their Reverie collection. When I got a manicure (gasp!) with my mom a few weeks ago, I nearly squealed when I saw that they had Adina, one of the Reverie polishes I had been eyeing. I hadn't tried a Zoya yet, so I immediately grabbed it and she definitely didn't disappoint! The Reverie polishes are metallic duo-chromes, so they change color with different lighting or when you move your hand. Anyways, I'd been staring at the Reverie collection and trying to rationalize the $36 price tag, which doesn't include shipping. Then I saw on their Facebook page that they had frequently been posting coupon codes, so I decided to wait it out and see what the next offer would be. Well, the Buy 3 Get 3 Free offer came up and I pounced! I was going to buy the whole Reverie collection, but I had just bought a gorgeous China Glaze orange (Riveting) and I have more silver polish than I know what to do with most days, so I bought four polishes from the Reverie collection (Adina, Happi, Lana, and Reece) and two from the Sparkle collection (Ivanka and Charla). My blue and green polishes were lacking, which is why I added two from the Sparkle collection into my order. Ok, that was a really long-winded story leading to the point: my pretties came in the mail today! They are beautiful and I can't wait to try them all! YAY! 

Sunday, March 18, 2012

HUNGER GAMES!

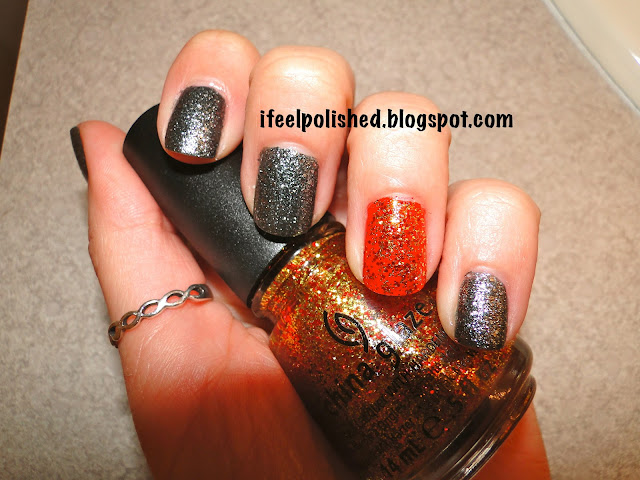
So just like many others, I am completely obsessed with The Hunger Games series by Suzanne Collins. I read all three of the books in one week several months ago. I am excited for the movie, though I am worried it's going to disappoint me just as books-made-into-a-movie have in the past. Either way, I wanted to celebrate The Hunger Games movie with a themed manicure this week! For those of you who don't know, China Glaze has polish that correlate with The Hunger Games called Colors from the Capitol. Though I don't buy polish strictly for their association with a movie, I did see some swatches for these and decided there were a few I wanted to add to my collection. I used two of them for this manicure.

OPI's How's It Snowin'? is one of my all-time FAVORITE polishes! It's a great dark grey that's loaded with glitter. One coat offers pretty good coverage, but two coats is perfect! It dries quickly, which I love. It is a bit of a top coat eater, so I usually do two coats of top coat for a smooth finish.

China Glaze's Riveting is a gorgeous jelly-esque orange that shimmers. It goes on smooth and has a really neat jelly finish when it dries. It does have a longer drying time than most of my other polishes. I used two coats of Riveting, though I think one coat would have been fine! Riveting is supposed to represent the technology that District 3 produces, but I saw it more as Katniss' dress when she is first coined as "The Girl on Fire." 

China Glaze's Electrify is a glitter-tastic polish that offers pretty good coverage for glitter in a clear polish. Electrify has gold and red glitter in it, the predominant color being gold. The gold glitter is small and the red glitter is larger. I only used one coat on my nails. Electrify is  representative of the power created in District 5, but again, I find it lends to the fire theme that runs throughout the books.

I wanted my manicure to show the smoke from the mines in District 12, but also pay homage to Katniss and her fire, both personality-wise and metaphorically. :) Also, I LOVE a good accent nail, so this is what I came up with. The first two pictures have flash, the second two don't have flash! Enjoy!  

Hunger Games NailsHunger Games Nails

Hunger Games Mani

Hunger Games Manicure

Tuesday, March 13, 2012

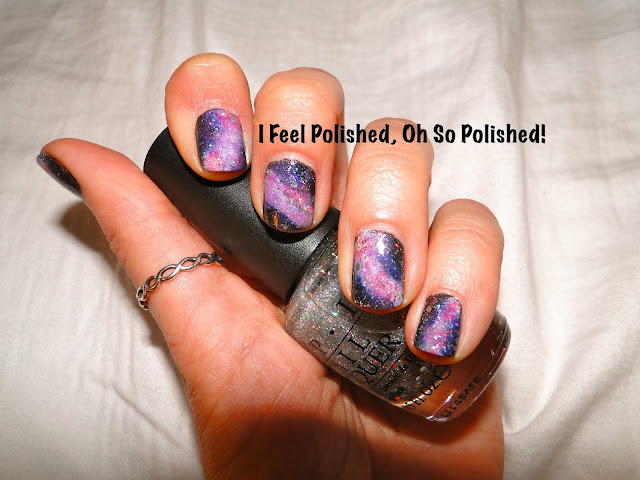
Galaxy Nail Fun!

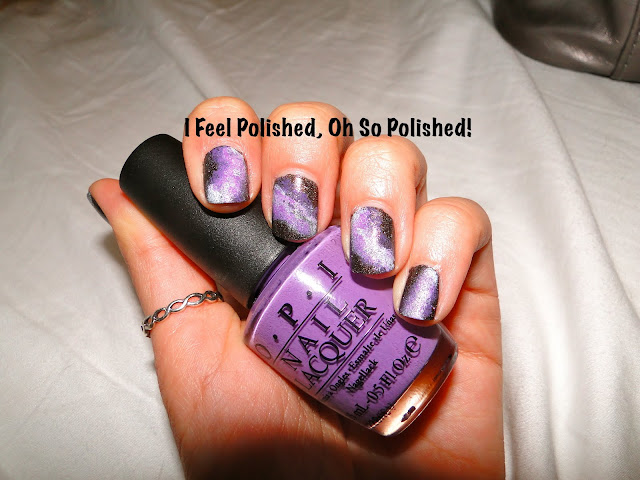
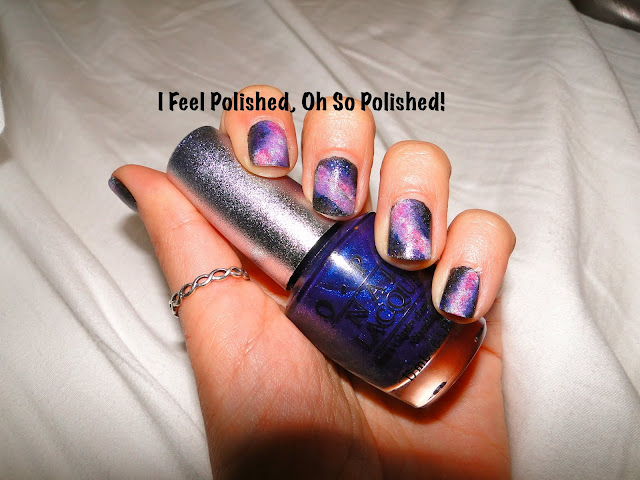
I've been seeing tons of pins on Pinterest with cool, starry looking nails. I assumed it was one of those Sally Hansen Salon Effects, which are cool but not for me, so I ignored the pictures. However, one caught my eye the other day and I ended up following the link to a YouTube video on how to create Galaxy Nails. By the end of the video, I knew I must give them a try! So, here is my first attempt at Galaxy Nails. I took pictures the whole way through to make it easier to understand. However, definitely look up a video if you're confused by the process! Enjoy!

Here's what you'll need:
A dark base coat, white, and then any other accent colors you'd like! I chose to have more of a purplish theme, but you can go with green, yellow, orange, anything you want! You'll also need a sparkly top coat!

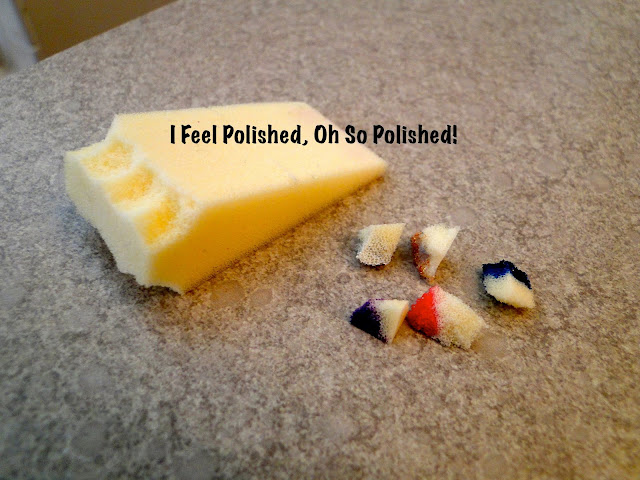
You'll also need a make-up sponge. Rip it into tiny pieces:

Galaxy Nails Tutorial

First, start with a darker base color. I've seen black recommended the most, but I had this awesome dark sparkly brown (OPI My Private Jet) that I really wanted to use. I did two coats and I allowed them to dry for about 5-10 minutes.

OPI My Private Jet
After you have your base coat, drip one or two drops of your white polish onto a piece of paper. Take one of your sponge pieces and, holding onto it with tweezers, dab it around on your nail in a shape you like. I dabbed my sponge on the paper once or twice before starting on my nail so there wasn't any excess polish.

Galaxy Nails
Each layer dries fairly quickly, so after you have the white on, repeat the process with your next color. Mine was purple. Dab your second color around the outside of the white and over the white a little as well.

Galaxy Nails
Continue on with your next color, dabbing it lightly on top of the previous colors.

Galaxy Nails How To
The blue is meant to blend the other colors into your darker base coat. Blend it in around the edges of your other colors.

Galaxy Nail Tutorial
I finished off with a little orange glitter I had. I just placed it in one or two random spots around my nail.

Galaxy Nail Tutorial
Finish up with a glittery top coat (and a plain top coat on top of that, if you want!). I chose one with smaller and larger hexagonal glitter pieces so I would have stars of different sizes. And viola, you have Galaxy Nails! You can also dot white around the nail to look like stars. I tried it on my pinky nail and I didn't like how it looked, so I dabbed blue over the dots. :)

Galaxy Nail Tutorial
Galaxy Nails Tutorial

Monday, March 12, 2012

Base Coat and Dotting Tools!

I never used a base coat up until a few months ago. I had a really gorgeous deep red polish on my nails for about a week and when I took it off, they were stained worse than ever before. It was such a gross yellow, it made me look like I was sick. So after that, I vowed to always use a base coat and I've never looked back! However, I do switch up my base coat depending on my needs. My nails tend to peel, and while I have lots of fun peeling them :), they don't look too cute afterwards. So I tend to use Essie Feed Me as my base coat to help prevent peeling as much as possible. Feed Me is an intense hydration treatment that can be worn alone or as a base coat. If I'm not using Feed Me, I use Essie 3-Way Glaze, which is a base coat, top coat, and a nail hardener all in one. It has been my favorite top coat lately, though I know a lot of people who swear by Seche Vite, which I haven't tried yet.

Ok, onto the manicure! I bought a dotting tool on Amazon last month and I just got the chance to use it! YAY! I have to say, the dotting tool was easy to use and left me with some really awesome nails! I even got asked what salon I had them done at! For this manicure, I started with OPI Chip Skip, then Essie Feed Me. Next, I used China Glaze For Audrey, China Glaze Recycle, and OPI Alpine Snow. I finished off with Essie 3-Way Glaze. 


And the manicure:

Flower Nails

Sunday, March 11, 2012

New Ventures

My name is Heather and I'm a teacher in Florida. My job is very stressful and I recently discovered that polishing my nails has been a great stress reliever for me! I love trying new styles and polishes and I love sharing them even more! I do not do this for anything other than my own enjoyment! My plan for this blog is to post my weekly (sometimes more!) manicures and give you my thoughts on the polishes I use. To start, I find it only appropriate to post a picture of my natural nails without any polish on them. I'm only holding the Essie polish so my hand didn't look like a claw! :)

Newer Posts Home