Saturday, August 31, 2013

Studded Nails

I've been dying to do studded nails for quite some time, so I finally got to them! I did them using micro beads, which I purchased at Michael's. They are usually in the scrapbooking section and they come in a pack of ten to twelve colors stored in vials. They are relatively cheap, especially if you use a 40% off printed coupon! :)

I began with two coats of Zoya Raven on my accent nail and two coats of Zoya Reagan on the rest of my nails. When those were dry, I used an orange stick to "poke holes" in the polish where I wanted to place the beads. I then polished over each column of holes with a thin layer of top coat. I used black micro beads over Reagan and magenta micro beads over Raven. Using my lick and poke method, I poked a bead with my orange stick and stuck it into one of the holes. I continued this method until all of the holes had a bead in them. These nails felt SO cool! Top coat will help these nails to last longer BUT it will bleed the color of the micro bead. Enjoy! :)
Studded Nails

Stud Nails

Studded Manicure

Studded Mani

Stud Manicure

Thursday, August 29, 2013

Indie Spotlight: Don't It Make My Brown Eyes Blue

I have another gorgeous ellagee polish for you guys today! This baby is brand spankin' new and I LOVE IT! 

Don't It Make My Brown Eyes Blue is a milk chocolatey brown holographic polish! Just like all of Laura's polishes, this polish is as smooth as butter! AND this polish is also a two coater! Plus, the holo is absolutely beautiful in it! Want even better news?! Every Friday, ellagee has a Flashy Friday sale where one polish is featured for $7. Don't It Make My Brown Eyes Blue is tomorrow's featured polish! She lists them at 12:00pm central and 8:00pm central! Enjoy! :)

ellagee Don't It Make My Brown Eyes Blue

ellagee Don't It Make My Brown Eyes Blue

ellagee Don't It Make My Brown Eyes Blue

Tuesday, August 27, 2013

Dotted Gradient

My giveaway ends tomorrow night!

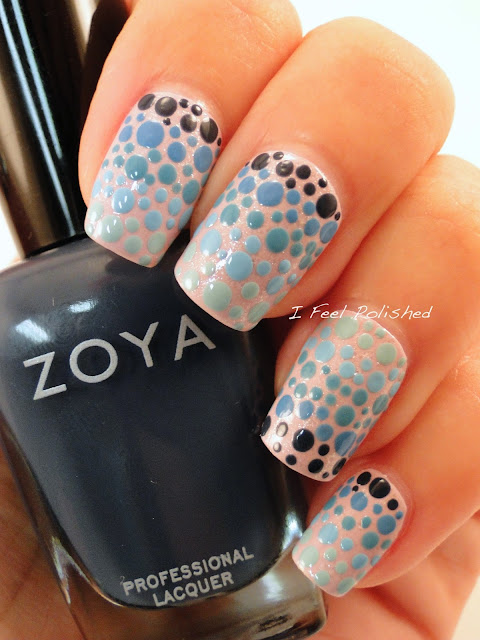
I love gradients! They are so easy and generally look awesome. But, they can get a bit old after a while, so I decided to do a different variation of the gradient: a dotted gradient!

I began with two coats of Zoya Heather. When that was dry, I added a coat of Square Hue Arctic Frost to give it a shimmery quality. I then alternated dotting on Zoya Natty, Yummy, Rocky, Square Hue Glacier Skies, and China Glaze Kinetic Candy. I used three different dotting tool sizes and went from darkest at the top of my nail to lightest at the bottom on my nail, except for my accent nail where I did the reverse. These looked really neat when they were done! Enjoy! :)
Dotted Gradient

Dotticure Gradient

Dotted Gradient Nail Art

Dotting Tool Nail Art

Monday, August 26, 2013

Incoco Nail Polish Strips

Of course you've already entered my giveaway, right?!
I was recently contacted by Incoco and asked if I'd be interested in reviewing their product. I have never used nail polish strips of any kind before but I figured it would be good to try and show you guys! 

are a wonderful way for people who aren't great at nail art to have artsy or perfect nails with minimal work! The Incoco strips are made of real polish, complete with a base and top coat. So it really is stick it and go! Each set comes with many sizes to choose from and they say they can last 14 days. You simply peel it, choose the side that matches your cuticle line shape, peel the backing off, and stick it on your nail! You can pull it off, move it, stick it down again, etc. until you're happy with the placement! Then, you just rub it well, file off the end, and viola! You're done! 

These really are great for people who are short on time and want great looking nails! For me, it was weird though, hahaha! First of all, my friends and family literally gasped when I said I was wearing nail polish strips since I always do my own art! Second, they took the same amount of time for me to put on that it normally takes for me to polish my nails, but I have a lot of practice and can polish fairly quickly! I also found that I HAD to put top coat on them. They were too thin for my liking and the cuticle area started to peel a day or so after application.

 Here are the pros and cons:

PROS
*Easy to use
*No mess
*Can stretch to fit
*Two ended strips to conform to different cuticle lines
*Enough sizes to choose from for all of your nails
*Nail art with minimal work
*Super easy removal with polish remover
*At $8.99, they are cheaper than a salon manicure
*Moveable to find the perfect placing

CONS
*Needed additional top coat, in my opinion
*Rip if you stretch too violently (Hahaha!)
*Didn't last the claimed 14 days-I got 3 days out of them

If you struggle with clean polish application or nail art, these are perfect for you! I really liked the design and the ease of use! Enjoy! :)

Incoco Nail Polish Strips Review

Incoco Nail Polish Strips Review

Incoco Nail Polish Strips Review
(The weird fit on my nails was simply user error. There are plenty of sizes, I just didn't choose well as this was my first time using these! Hehehe!)

Saturday, August 24, 2013

Waterfall Nail Tutorial

Giveaway!!!! :)

Since my rendition of Waterfall nails were such a hit, I figured a tutorial was in order! I absolutely love these nails and they are SO easy! Thanks to The Nailasaurus for creating them! The only tool required is a thin nail art brush but any thin paint brush would work just fine, I'm sure! Begin with your base color. I try to pick a color that will allow the waterfall art to take center stage. For these nails, I went with two coats of Zoya Harley:

Zoya Harley

Then, choose four to six colors for the waterfall part of the nail art. I always begin with the lightest color and work up to the darkest, but that's just preference. I began with Zoya Kerry. I put a blob of the polish I'm working with on a piece of paper. I then dip the tip of the thin brush in it, place it at my cuticle line, and drag it downward. I vary the length of the line each time.

Waterfall Nail Art Tutorial

I continued the process with Zoya Channing:

Waterfall Nail Art Tutorial

Zoya Giovanna:

Waterfall Nail Art Tutorial

Zoya Mason:

Waterfall Nail Art Tutorial

And Zoya Neve:

Waterfall Nail Art How To

Finally, I go back over the cuticle line with each color again if there are areas that need to be filled in! And that's it! Easy, right? Enjoy! :)
Waterfall Nails

Waterfall Nail Art

Waterfall Manicure

Waterfall Nails

Thursday, August 22, 2013

Indie Spotlight: You Polish Neon Toppers Part 2

I have some more awesome neon glitter top coats for you today from -->You Polish -->! These were recently released and they are AWESOME! The only problem I had was deciding what color to use as undies! :) These toppers were great in just one coat and they were smooth, smooth, smooth! These retail for $7.75 for a 15ml bottle! 

First up is Endless Summer! This glitter topper has pink, yellow, and red hexes along with green squares, mini blue bars, and some iridescent glitter! This is one coat over Zoya Yummy and it is so pretty! 

You Polish Endless Summer

You Polish Endless Summer

You Polish Endless Summer

You Polish Endless Summer

Pop Graffiti was the other glitter topper I used. It has pink, red, blue, green, teal, and yellow hexes, black and white shreds, and some holo dust! HOLO DUST! I did one coat of this amazing polish over Zoya Arizona. Enjoy! :)
You Polish Pop Graffiti

You Polish Pop Graffiti

You Polish Pop Graffiti

You Polish Pop Graffiti

Tuesday, August 20, 2013

Studded Plastic Wrap Nails Tutorial

Don't forget about my giveaway! :)

I promise, I've been trying to get better at tutorials! They are just so time consuming and make my posts picture heavy. I hope you're ready for a lot of pictures today! :) 

Today I did plastic wrap nails! I really love this form of nail art because it really is simple and practically everyone has some form of plastic wrap at home! Begin by choosing two colors. I'm going with Zoya Neve and Mason today. Polish your nails the lightest color first. Zoya Mason is a really great red-violet-pink metallic polish that almost seemed like it has a little bit of a bluish duochrome to it!

Zoya Mason

Zoya Mason

Then, get your plastic wrap ready. I rip a section off of the roll that it about two inches tall. Then, I cut it in half:

Plastic Wrap Nails Tutorial

Keep going until you have ten of these pieces. Then, ball them up:

Plastic Wrap Nails Tutorial

Before you begin, make sure your base color is dry! Then, working on one nail at a time, polish over that color with your darker color. Take a balled up piece of plastic wrap and dab it all over your nail until you are satisfied with the look:

Saran Wrap Nails Tutorial

Continue doing this until all of your nails are done! My darker top color was Zoya Neve, a sapphire blurple-ish metallic.

Plastic Wrap Nails

Plastic Wrap Nails

Saran Wrap Nails

Then, to jazz these up, I added some silver studs. To do this, I just added some top coat and, using an orange stick and my lick-and-stick method, stuck the studs on! These studs are from the Born Pretty Store and they are awesome! Easy to work with and really affordable at $5.86 for a whole baggie! After those were on, I added another layer of top coat to seal them in! I've had this mani on for four days and they still look awesome! Enjoy! :)

P.S. Born Pretty Store has offered all of my readers a 10% discount! And they always have free shipping! Eeek! Use the code: HTCG10 on any order you place! I got my stuff in two weeks and all of it was great! I'll be showing you some more of it soon! You can also find the link to your right at all times! <3


Born Pretty Store Silver Studs

Silver Studded Nail Art

Studded Nail Art

Studded Nail Art

*The products in this tutorial were provided to me. All opinions are my own, as always!*

Monday, August 19, 2013

Indie Spotlight: Silly Bee's Chickadees

Have you entered my giveaway yet? :)


Silly Bee's Chickadees caught my eye a few months ago with her awesome and unique bottles. Since then I have seen some swatches of her beautiful polishes and now I have one to show all of you today! Silly Bee's Chickadees polishes are three free and right now they are on sale for just $6! 

The polish I have for you today is called Always Azure and it's a medium blue crelly with copper and gold glitter in a variety of sizes. This polish was super easy to apply. I did three thin coats and they were smooth as smooth can be! The bottles are a neat shape but their tall, thin nature made me scared it would fall over as I was polishing. It didn't though and the polish more than makes up for my own fear! I love the color of the glitter in this polish, especially the way it gets sandwiched in with each coat. Want to know the best part about this polish? 25% of the sales of Always Azure goes to Ronald McDonald House! Enjoy! :)


Silly Bee's Chickadees Always Azure

Silly Bee's Chickadees Always Azure

Silly Bee's Chickadees Always Azure

Silly Bee's Chickadees Always Azure
Newer Posts Older Posts Home